

Appointment Reminders
Email And Text Message Reminders
Appointment reminders are automated messages sent to patients shortly before their appointment to remind them of the time and date and ask them to confirm their attendance. Reminders go by email and SMS. Both channels work in this stage, unlike Confirmations which are email-only.
The email reminder carries significantly more information than the SMS: the event name, practitioner, office address, an OutSmart Meet link for virtual visits, a note to complete any outstanding intake forms, and a confirm-attendance button. The SMS is the timely, glanceable ping that gets read even when the patient isn’t checking email, along the lines of “you’re booked tomorrow at 10” with a confirm link. Configure both whenever you can; the email is essential, the SMS catches patients who’d otherwise miss the email.
Why SMS Is Used at the Reminder Stage but Not at Booking
OutSmart sends SMS only for reminders, never for confirmations. At booking time, the email carries the substance that an SMS cannot: intake forms, custom messages, and attachments. Sending a duplicate SMS confirmation alongside the email would risk patients dismissing the email as redundant and missing the forms they need to complete. By the time the reminder fires close to the appointment, the forms have already been sent and the SMS becomes a useful, timely nudge. See Appointment Confirmations for the booking-time flow.
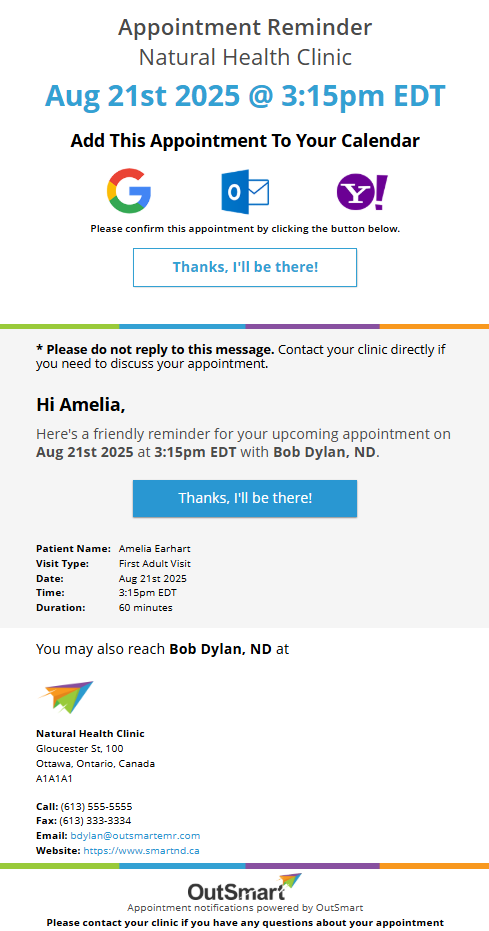
Sample Reminder Email

Sample Reminder Text Message
What a patient needs before text reminders can go out
A patient can be receiving every email perfectly and still never get a text, because the two channels read different fields on the patient’s profile. Text reminders need both of the following:
- A number in the Mobile field on the patient’s profile. Text messages only ever go to the Mobile field. A number in the home or work phone field is never texted.
- The SMS checkbox beside that field checked. This is the patient’s consent to be texted. Without the checkmark, no text goes out even when the Mobile field is filled in correctly.
Check both of these first whenever a patient reports that texts are not arriving. Also check that the number in the Mobile field really is a mobile number, since a landline cannot receive text messages at all. The other thing to check is the event type itself: email and text reminders are separate rules, so an event type set up with only an email reminder never sends texts to anyone.
For the full list of conditions that decide whether any notification is sent, see When Notifications Are Sent (and When They Aren’t).
Purpose and Difference from Confirmation Emails
In contrast to the Appointment Confirmation Email (sent immediately after booking), the Reminder Email’s primary purpose is to serve as a courtesy reminder for an upcoming appointment. It also prompts the patient to confirm their attendance.
The Reminder Email includes certain default information, such as the date and time of the appointment, the practitioner’s name, and the office address. You can customize the message content itself, as well as control when and how many reminders are sent.
Reminders chase unfinished intake forms
If the appointment type has SmartForms V2 attached and the patient hasn’t finished them, the reminder names the outstanding forms and includes their links again. Once the patient has completed everything, reminders stop mentioning forms at all.
Nothing to configure. It follows from the forms being attached to the appointment type. See Smart Forms In Appointment Reminders.
Setting Up Auto-Reminders
Appointment reminders are configured in the Event Manager, which is part of the Calendar Module. Each event type has its own reminder settings.
OutSmart checks for reminders that are due once an hour, so a reminder goes out within the hour of its send time. A reminder whose send time has already passed is skipped. For example, if an appointment is booked for tomorrow morning and the event type has a 2-day email reminder, that email reminder is not sent. Reminders are not sent for repeating (recurring) events.
Accessing the Event Manager
To configure auto-reminders, you first need to access the Event Manager.
- Open the Calendar Module by clicking the purple calendar icon in the top right toolbar.
- Once the calendar is loaded, click the gear icon at the top right of the calendar.
- From the calendar settings menu that appears, click Event Manager.
Adding a Reminder to an Existing Event Type
- Go to the Event Manager screen and find the event type you want to edit. You can use the Search box at the top right to locate it.
- Click the pencil icon in the right-most column of that event type’s row. This opens the Modify Event Type editor.
- Scroll down to the Reminders section, towards the bottom of the editor.
- Click Add Reminder. A new reminder row appears.
- In the drop-down at the start of the row, choose Email or Text Message.
- Enter how far ahead of the appointment the reminder should go out. An email reminder is set in Days before appointment, and a text message reminder is set in Hours before appointment.
- Repeat steps 4 to 6 for each reminder you want. Email and text message reminders are separate, so add one of each if you want both. To take a reminder away, click the trash can icon at the end of its row.
- In the Email Reminder Message field below the reminders, type any message you want added to the reminder email. Your message appears after the opening sentence that names the patient, the date, the time and the practitioner.
- Click save at the bottom of the editor.
What the patient sees when they click the confirmation button
The confirmation button in a reminder email, and the matching link in a reminder SMS, open a page that shows the patient their appointment. Opening the page does not confirm anything. The appointment is confirmed only when the patient clicks the I’ll be there! button on that page.
The page is headed Will you attend? At the top it shows your clinic’s logo, name, address and phone number, and the practitioner’s name and photo. Below that it shows the appointment’s date and time in your office’s time zone, the event type, the practitioner, and whether the patient attends in person at your address or online.
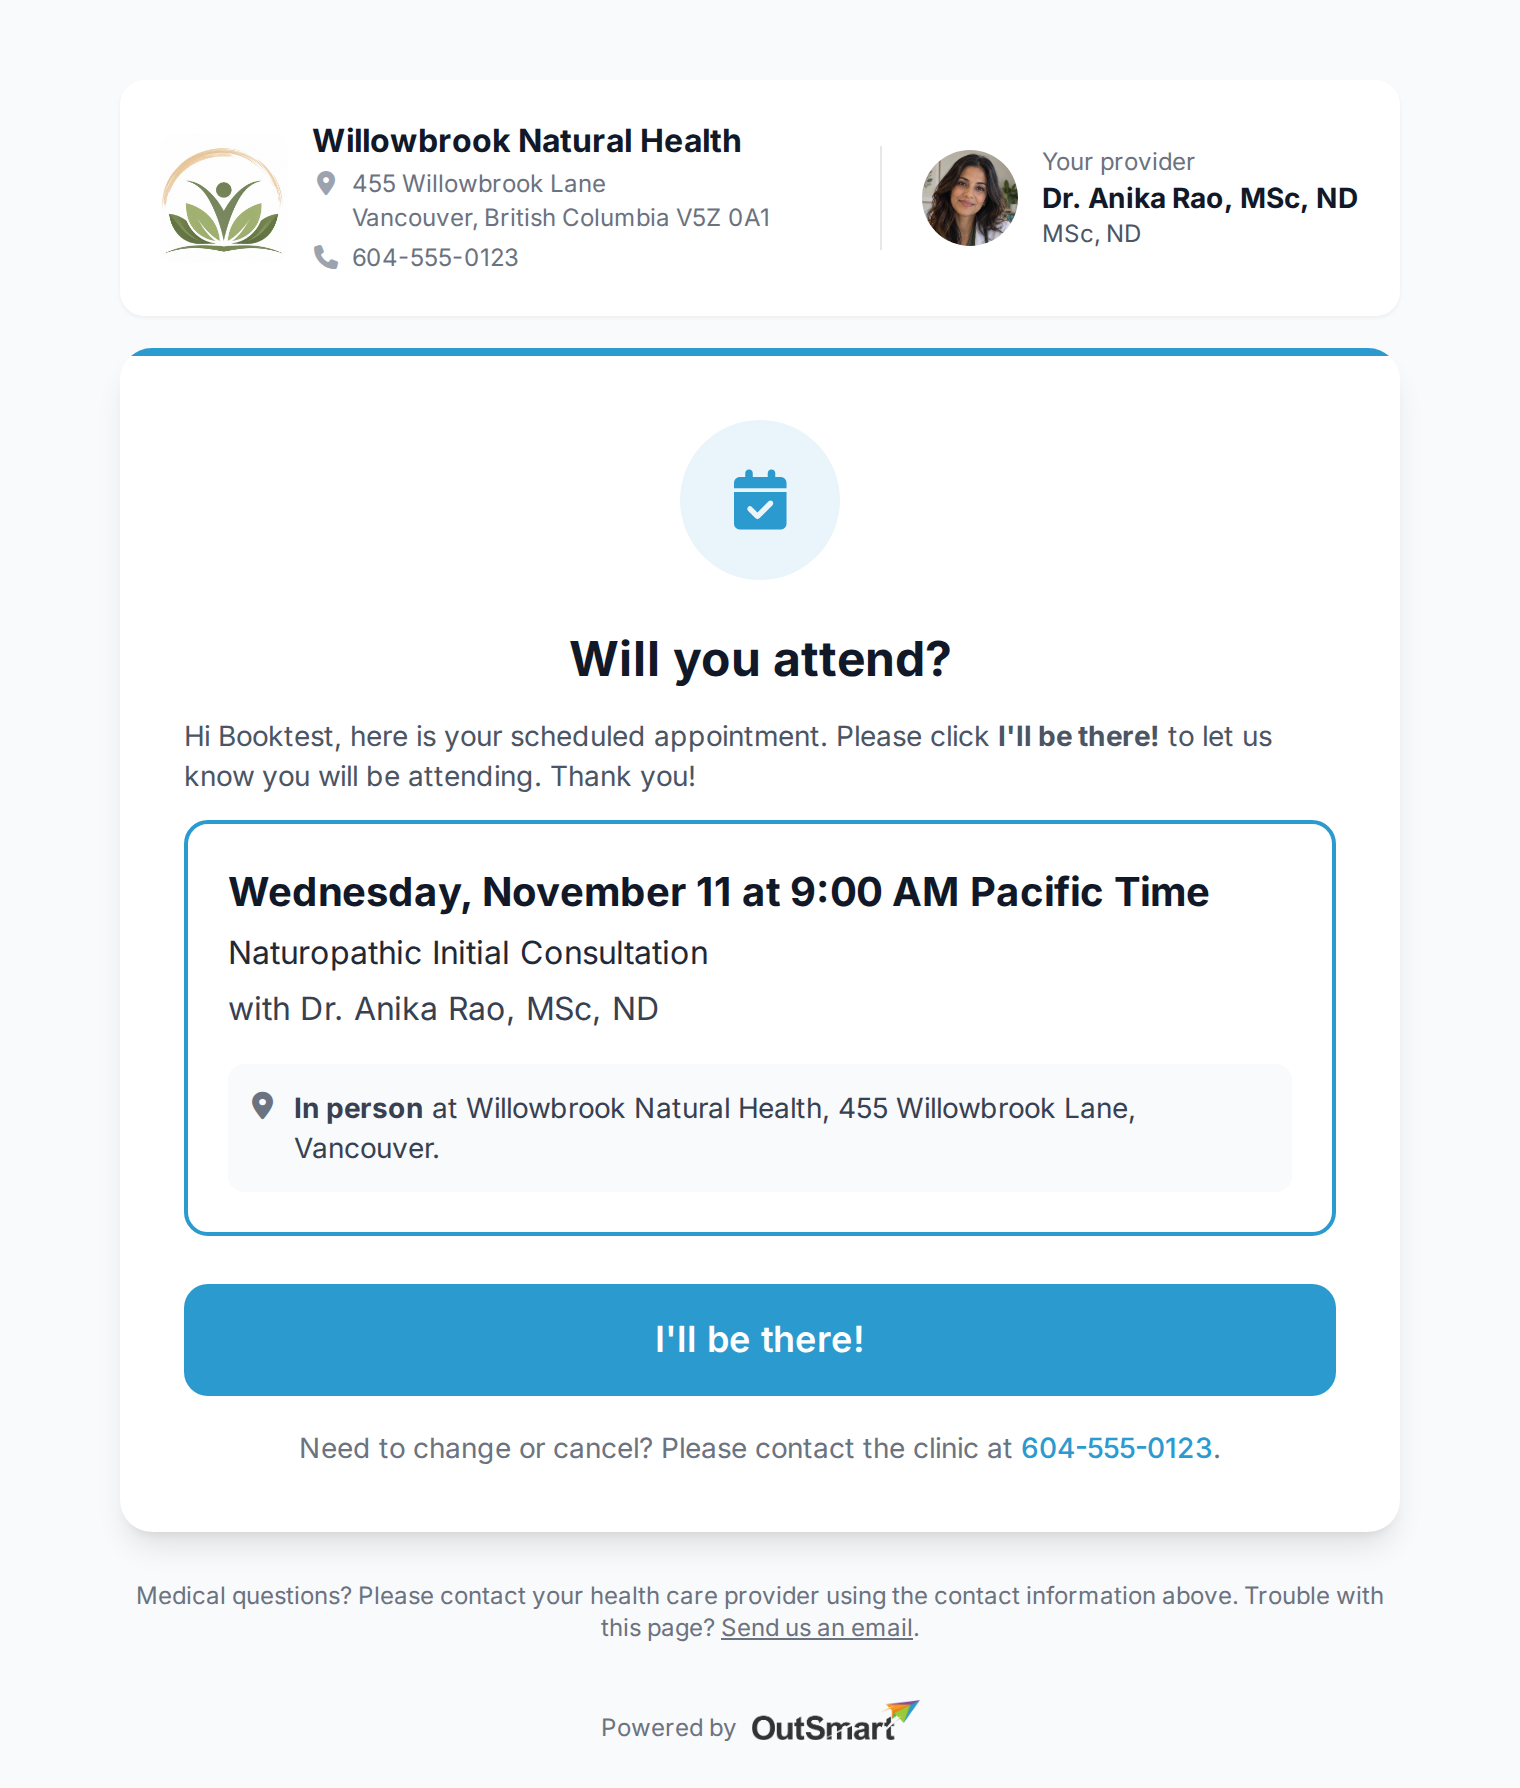
This is the page a patient sees after clicking the confirmation button in a reminder. The appointment is not confirmed until they click I'll be there!
When the patient clicks I’ll be there!, the appointment’s status in your calendar changes to Confirmed, and the page changes to say Your appointment is confirmed. Opening the same link again later shows the confirmed page.
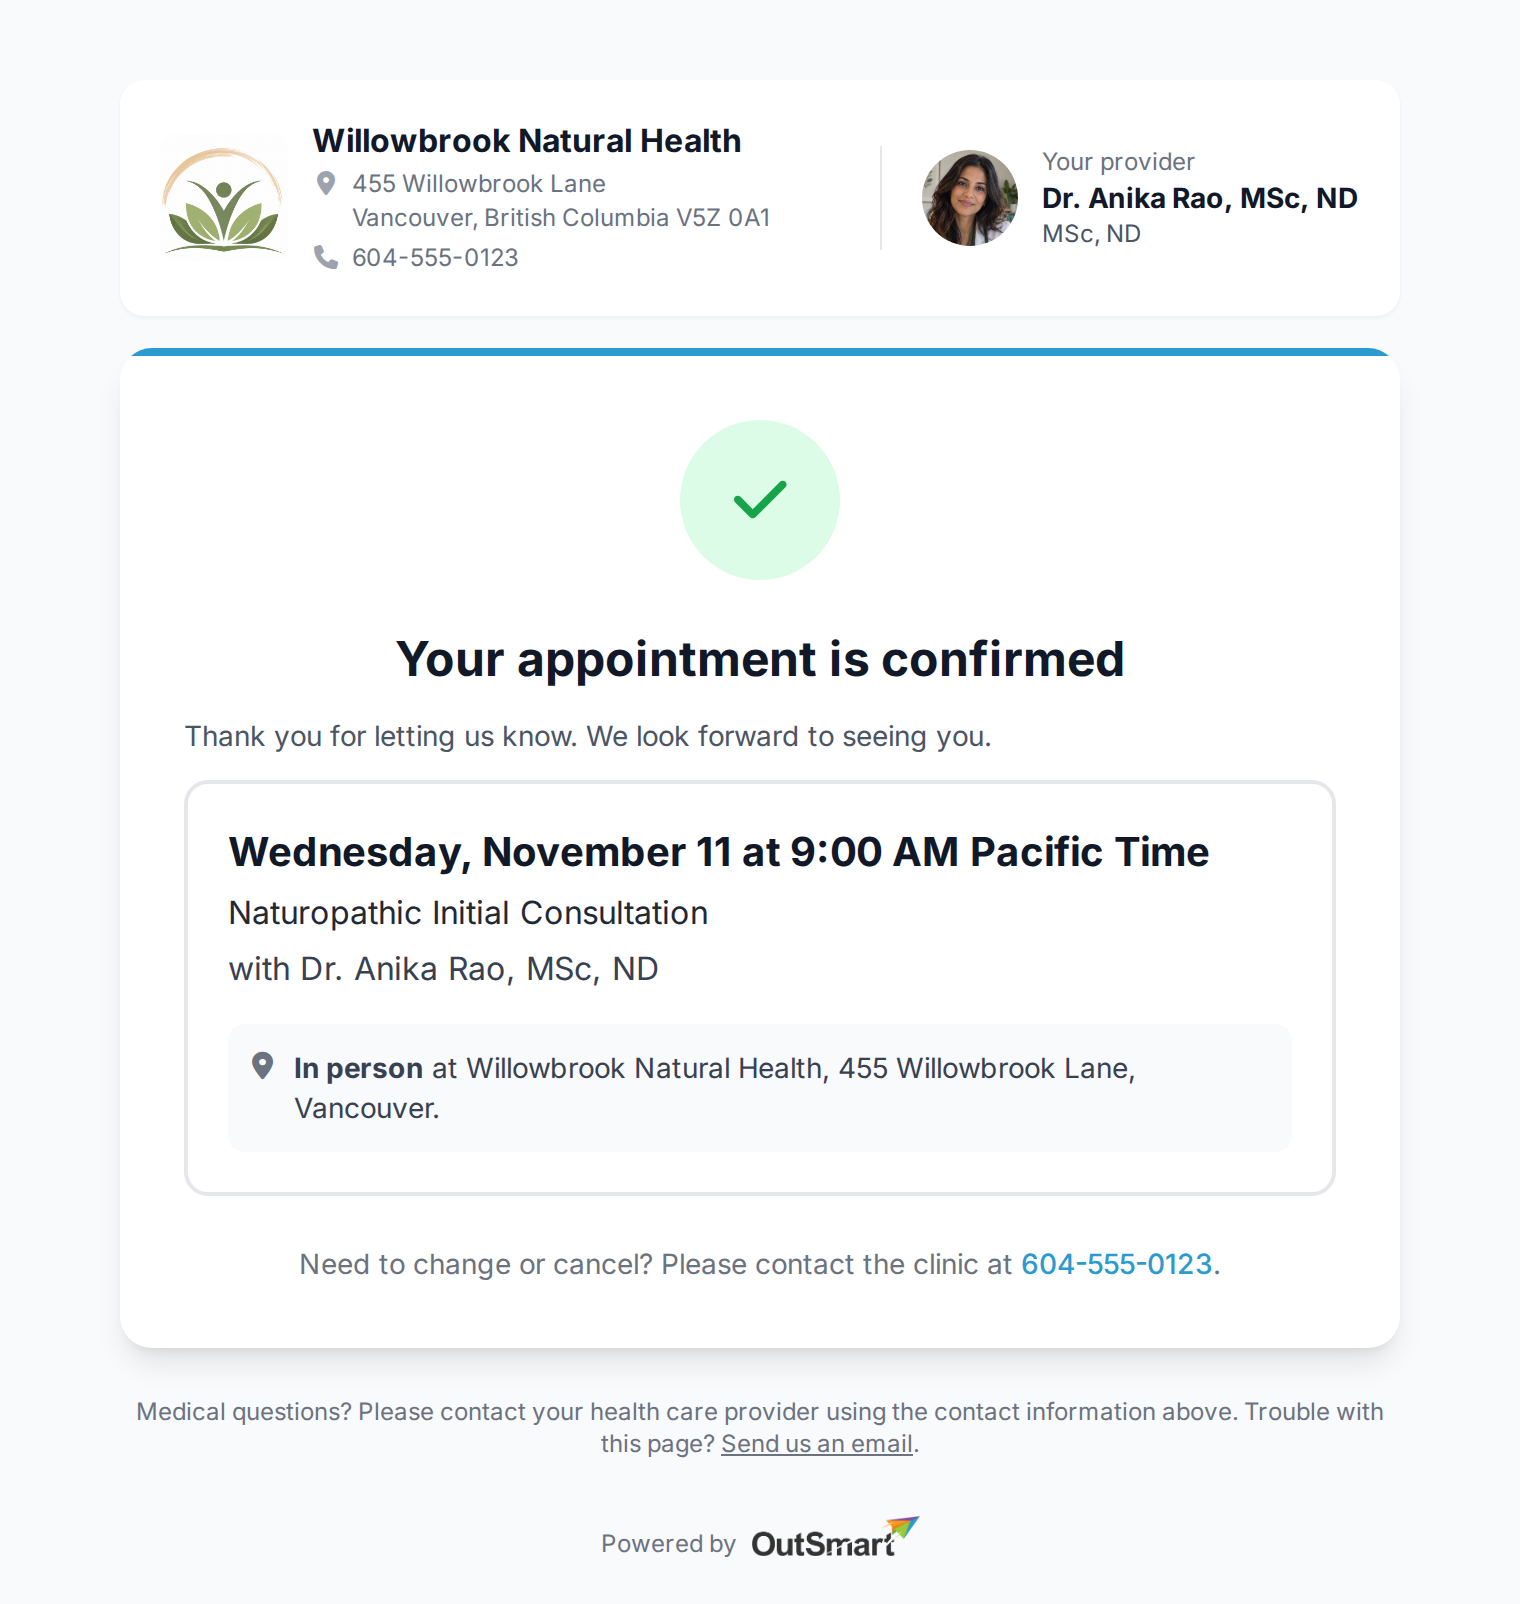
After the patient clicks I'll be there!, the page says Your appointment is confirmed, and the appointment shows as Confirmed in your calendar.
Both versions of the page end with Need to change or cancel? Please contact the clinic at and your clinic’s phone number. The page does not change or cancel appointments.
If the appointment has been rescheduled, cancelled or changed since the reminder was sent, the link no longer matches it. The page then says it could not confirm the appointment, and asks the patient to phone the clinic.
Phones and email programs often open links by themselves to check them or to show a preview, before the patient reads the message. Because the patient has to click I’ll be there!, those automatic checks do not confirm the appointment.
Controlling the confirmation button in reminder emails
When a patient confirms their appointment from the confirmation button in a reminder email (or the matching link in a reminder SMS), the appointment is marked as confirmed in your calendar, and no further reminders go out for that appointment. That’s the right behavior for the last reminder, but if a patient confirms too early on a far-out reminder, they stop getting any further reminders and may end up missing the appointment.
The Confirmation Button settings sit under the Email Reminder Message field in the Reminders section of the event type editor. There are three settings:
- Show confirmation button on reminder emails? This switch decides whether reminder emails include the confirmation button.
- Show confirmation button on reminder text messages? This switch decides whether reminder text messages include the confirmation link.
- How far in advance of the visit should the confirmation button be shown? This setting appears while at least one of the two switches is on. Choose Always to include the button in every reminder, or Within X days of appointment to include it only in reminders sent close to the appointment. When you choose Within X days of appointment, enter the number of days in the Days field, from 1 to 7.
Showing the button only close to the appointment (recommended for most cases). Choose Within X days of appointment. Far-out reminders go out without the button, so patients still get the heads-up but cannot confirm and stop the reminders yet. The reminders sent close to the appointment include the button, so patients can confirm when it matters. For example, enter 2 if you want only the reminders going out within 2 days of the appointment to include the confirmation button. A reminder sent 5 days ahead still goes to the patient, but without the button, and a later reminder closer to the date has it.
Turning the button off. Turn off both switches if you do not want patients to confirm by themselves, for example if your reception confirms appointments by phone and the reminders are only a courtesy. No reminder then includes the confirmation button or link, so reminders keep going out on their schedule right up to the appointment. You can also turn off just one switch, for example to keep the button in emails but leave it out of text messages.
To change these settings:
- Open the calendar and click the gear icon at the top right.
- Select Event Manager.
- Find the event type you want to configure and click the pencil icon on its row.
- In the event type editor, scroll to the Confirmation Button settings in the Reminders section near the bottom.
- Click save at the bottom of the editor.
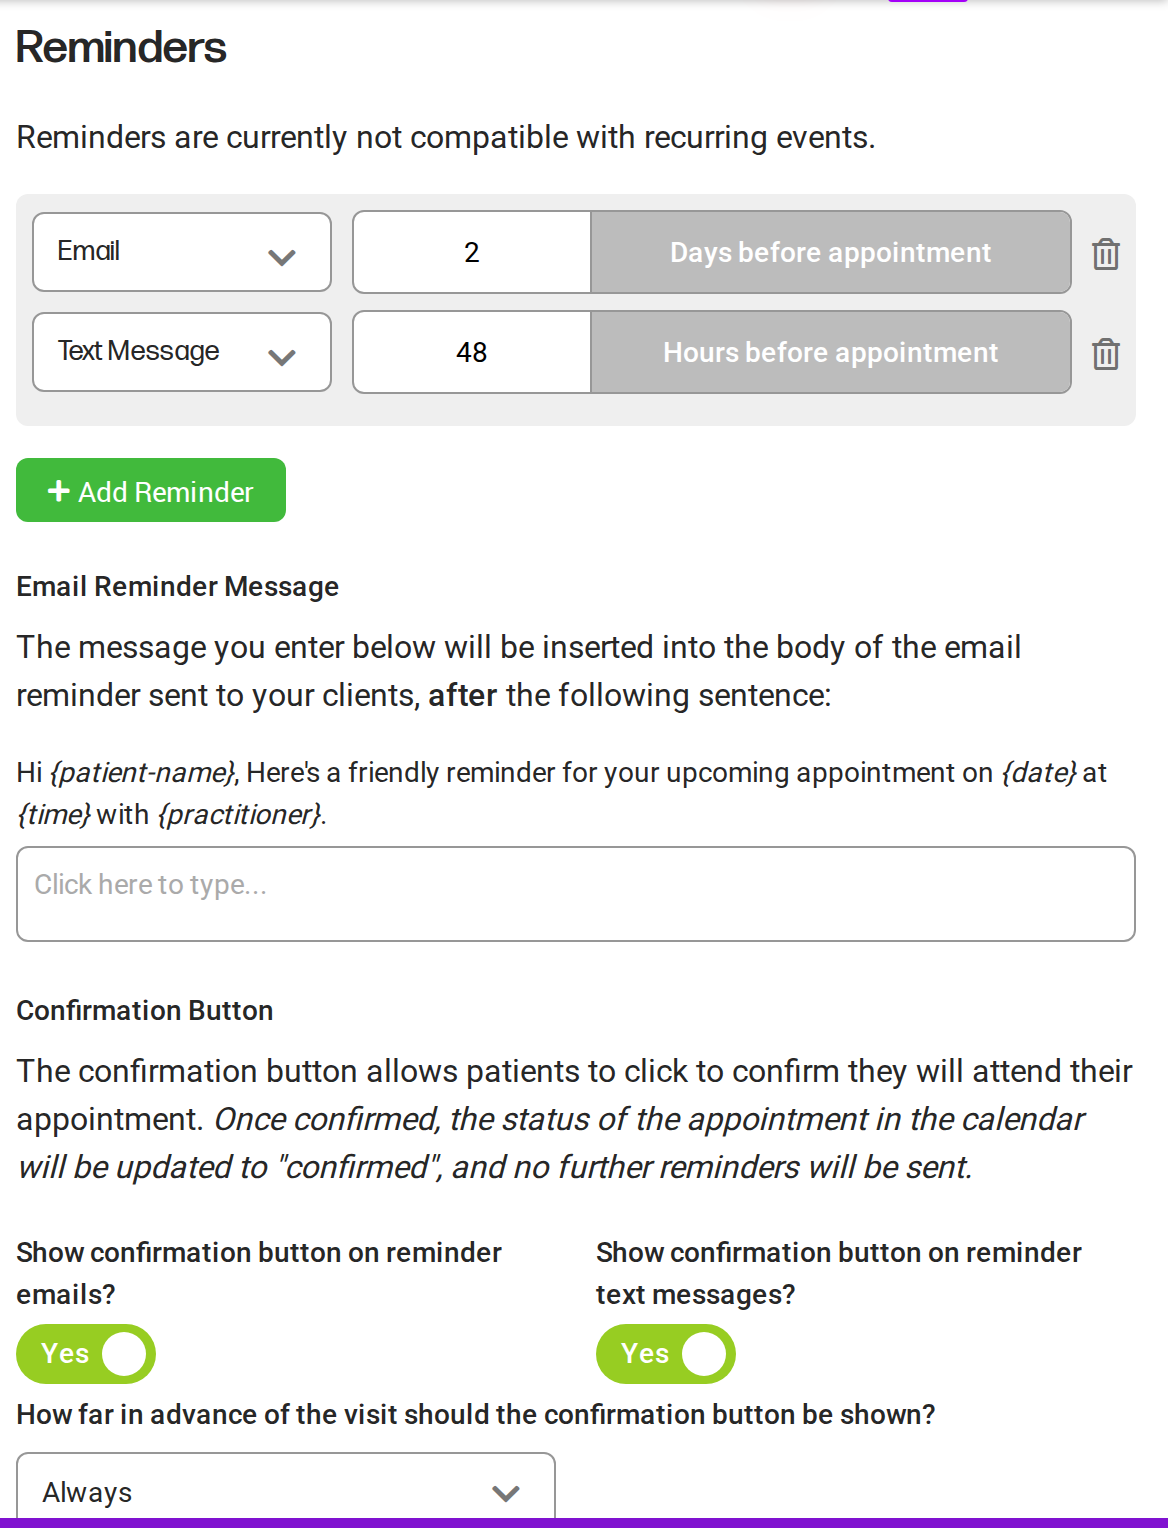
The Confirmation Button settings sit under the Email Reminder Message in the Reminders section of the event type editor.