

Find Availability Tool
The Find Availability tool lives in the calendar toolbar. It searches ahead for available appointment slots that fit a patient’s preferences: specific days, times of day, practitioners and appointment type. When the search returns matches, you can click any slot to start an appointment with the patient already filled in. If nothing fits, you can add the patient to the waitlist in the same window, without typing their preferences again.
It reads a patient’s preferences the same way the Waitlist Dashboard Card does, so a search here and a waitlist entry find the same openings.
Opening Find Availability
- Open the Calendar.
- Click the magnifying-glass icon in the calendar toolbar (top right).
- A small menu appears with two options:
- Search Calendar finds events that are already in the calendar. See Calendar Search.
- Find Availability opens the window described in this article.
- Click Find Availability.
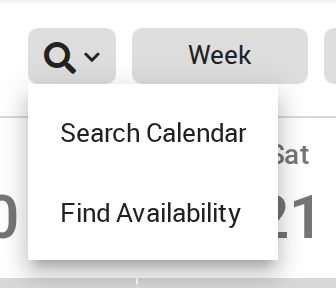
Choose Find Availability from the magnifying glass menu.
The Three-Stage Flow
The Find Availability window walks through three stages, all in the same window:
| Stage | What You See | Primary Action |
|---|---|---|
| 1. Search | The full form (patient, practitioner, appointment type, availability, date range) | Find Availabilities |
| 2. Results | The form, with a list of matching slots below it | None of these work — Add to Waitlist, or click any slot |
| 3. Waitlist | The form, with three extra waitlist fields below it | Confirm — Add to Waitlist |
You can run the search again at any time by clicking Find Availabilities. That takes you back to Stage 2.
Stage 1: The Search Form
Every field collects information about what the patient is looking for.
Patient
Pick the patient from the dropdown. It searches the full office patient list. The patient is needed only if you add them to the waitlist. You can search for slots without choosing a patient, for example for someone standing at the desk who is not in OutSmart yet.
Practitioner(s)
You can pick one or more practitioners to search across.
- If you’re logged in as a practitioner, this starts with your own name filled in. You can remove yourself or add other practitioners.
- If you’re logged in as admin staff, it starts empty.
- Practitioners with private calendars or who have Authorize Changes to Calendar turned off are hidden from other practitioners’ lists. Admin staff see everyone.
When you pick more than one practitioner, OutSmart searches each of their calendars. Each slot in the results shows the name of the practitioner it belongs to, so you know who is free.
Appointment Type
Pick the type of appointment. The list shows only the types the selected practitioners offer.
Availability
Availability has two choices:
- Specific days/times only is selected when the window opens. It shows the Days & Times grid so you can say when the patient is free.
- Any available time finds the earliest openings on any day and at any time.
Days & Times Grid
The grid is shown when Specific days/times only is selected. Check every day and time-of-day box (AM, PM or Eve) when the patient is free. You must check at least one box, or choose Any available time, before you can search.
From / Until Date Range
The From and Until dates are optional and always shown, whichever Availability choice you make. They limit the search to slots that start inside those dates. If you leave From empty, the search starts today.
Find Availabilities
Click Find Availabilities to run the search. OutSmart looks through each selected practitioner’s open times, keeps the ones that fit the patient’s days, times and dates, and shows the earliest of them, about 15 slots. See Limitations for how far ahead the search looks.
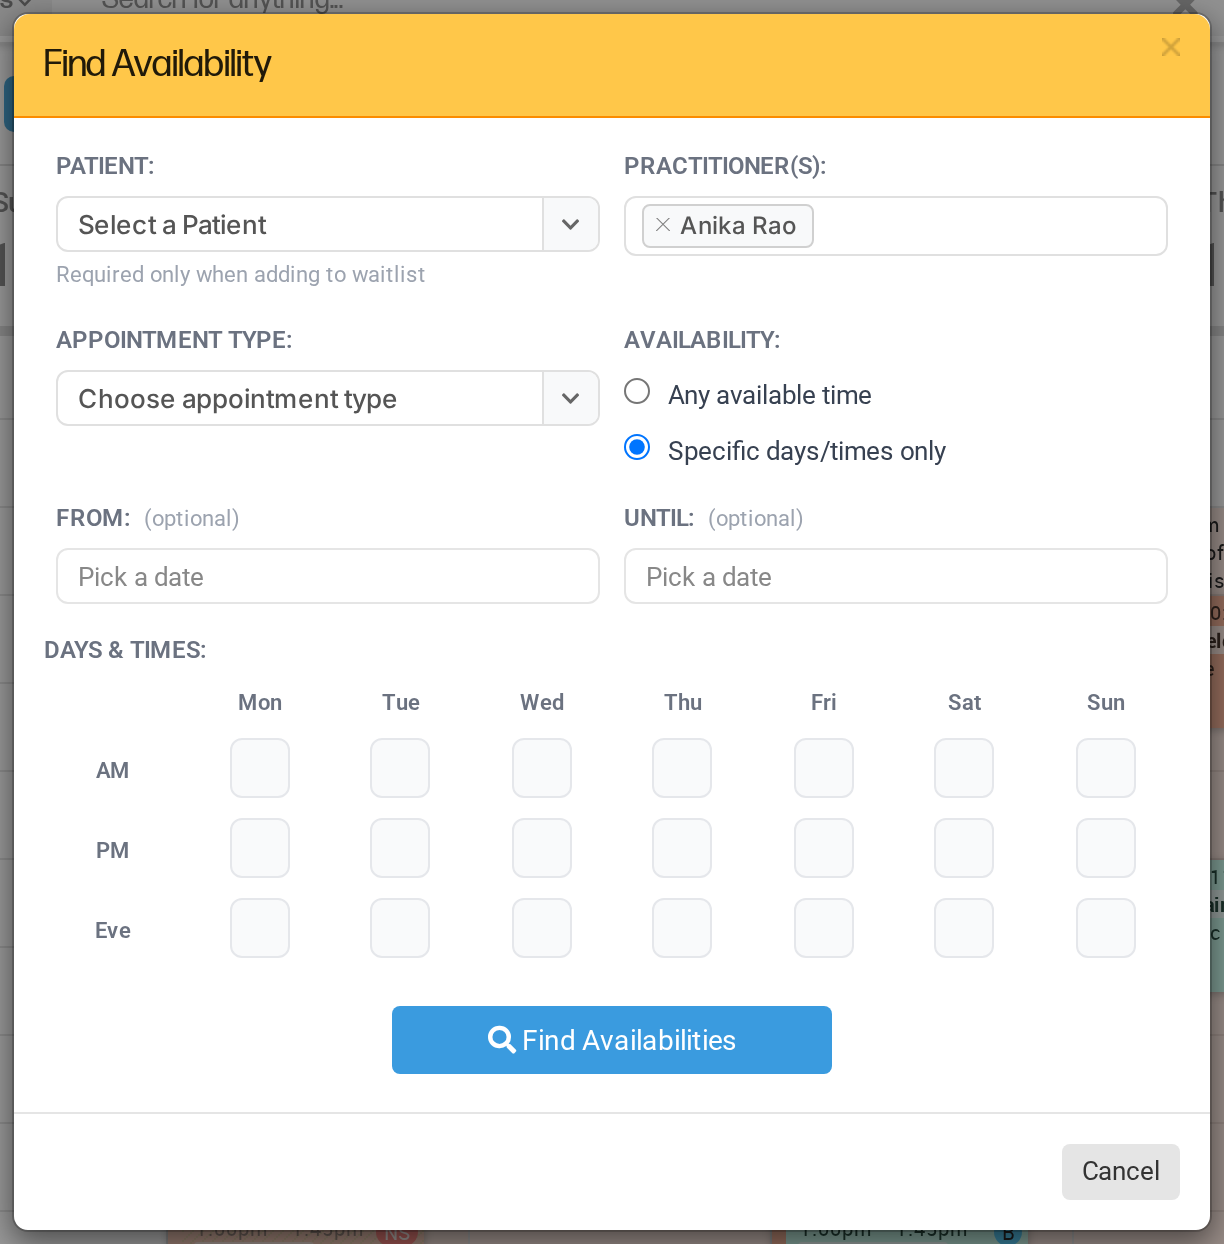
The Find Availability window. Choose the practitioner, the appointment type and the patient's preferred times, and then click Find Availabilities.
Stage 2: The Slot List
When the search returns matches, a list of slot buttons appears below the form under Earliest available slots:, grouped by date. The dates are in order, earliest first, and a day is never cut off part way: you always see every matching time for a day.
Each slot button shows:
- The time (for example,
9:30 AM) - The practitioner’s name on a second line, when you searched more than one practitioner
Clicking a Slot
Click any slot button to start an appointment:
- The Find Availability window closes.
- The calendar moves to the chosen day.
- The event editor panel opens with the appointment filled in: patient, practitioner, appointment type, start time, and an end time based on the type’s length.
From there, the booking works the same as creating an event yourself. Review the details, add notes if you want to, and click Save or Save & Send. See Booking Events for the rest of the steps.
When No Slots Are Found
If the search finds nothing, the window says No matching slot found in the next 12 months. The None of these work — Add to Waitlist button is still there, so you can add the patient to the waitlist for future openings.
Stage 3: The Add to Waitlist Branch
Click None of these work — Add to Waitlist to show the waitlist fields. The button is shown in Stage 2 whether or not matches were found. The slot list is hidden while the waitlist fields are shown.
Under the heading Please fill out these fields to add this patient to the waitlist:, three extra fields appear below the search form:
Minimum notice
How much warning the patient needs before an appointment. Choose Same day, 1 hour, 2 hours, 24 hours, 48 hours or 1 week.
Notify by
Check each way the patient is happy to be contacted: Email, SMS or Phone Call. When you check a box, a field opens with the patient’s email address or phone number from their record. If you change the email address or phone number here, the change is saved to the patient’s record.
Notes (optional)
Notes for your staff. The patient does not see them.
Confirm — Add to Waitlist
Click Confirm — Add to Waitlist to save the waitlist entry. A patient must be chosen in the Patient field. The entry uses every field from the search form (patient, practitioners, appointment type, days and times, date range) as well as the waitlist fields you just filled in. After saving, the window closes, the message Patient Added to Waitlist appears, and the entry shows straight away on the Waitlist Dashboard Card.
When to Use Find Availability vs. the Add to Waitlist Panel
The two tools share most of the same form. The right choice depends on what you’re trying to do:
| Goal | Use This |
|---|---|
| Find an opening that fits a patient’s preferences | Find Availability |
| Add a patient to the waitlist with no search needed | Add to Waitlist panel (the + on the dashboard card) |
| Search, and if nothing fits, add them to the waitlist anyway | Find Availability |
| Already know the patient wants a specific time | The calendar: book directly |
Find Availability is the calendar’s companion to the Add to Waitlist panel. It is built for staff who want to check for an opening first, and add the patient to the waitlist second.
Both Outcomes in One Visit
The window does not let you book a slot and add the patient to the waitlist in the same pass. If you want both (book a slot for now, and keep a waitlist entry in case something better opens up), do it in two passes:
- Open Find Availability, run the search, click the slot you want, and finish the booking in the calendar.
- Open Find Availability again for the same patient, click None of these work — Add to Waitlist, and confirm the waitlist entry.
Limitations
- The search looks at each practitioner’s next 200 open times. It counts them from the From date, or from today when From is empty, and never looks more than 12 months ahead. For a practitioner with a lot of open time, those 200 open times can run out well before 12 months. If the patient can come only on a few days, or you want openings further ahead, set a From date.
- OutSmart shows about 15 slots and never cuts a day in half. If the last day it shows has many openings, you see all of them, so you may get a few more than 15.
- Slots can be taken between the search and your click. Another booking can fill a slot after the list appears. Check the calendar before you save the appointment.
- Staff always choose the practitioners. There is no “any practitioner” choice in this window. You pick the specific practitioners to search across. (Patients adding themselves to the waitlist through online booking can choose any available practitioner.)
Troubleshooting
Find Availability isn’t in the magnifying-glass menu
Find Availability is part of the standard OutSmart calendar (Calendar 2.0). If your clinic is using Calendar 1.0, this tool isn’t available. Switching to Calendar 2.0 adds it to the magnifying-glass menu.
A practitioner I expect to see isn’t in the list
- Their calendar may be set to Private. Private calendars are hidden from other practitioners’ lists.
- They may have Authorize Changes to Calendar turned off. That also hides them.
- Admin staff see everyone. If you are admin staff and you don’t see someone, check that their account is active and linked to this office.
Find Availability returns nothing for what looks like a wide-open calendar
- Check the days and times you checked. Narrow preferences with only a few practitioners can find nothing even when other times are free.
- Check the Hours of Operation for the selected practitioners. Slots appear only inside Hours of Operation.
- Check the From and Until dates. Slots outside them are not shown.
- Set a From date further ahead. See Limitations.
- Try Any available time to see whether there is any opening at all.
Clicking a slot opens the wrong panel or an empty area
This is rare. Close the event panel, open Find Availability again, run the search and click the slot again. If it keeps happening, refresh the page and search again.
Related Pages
- Adding a Patient to the Waitlist: the add form on the dashboard card
- The Waitlist Dashboard Card: where waitlist entries are managed
- Booking Events: what happens after you click a slot
- Calendar Search: the other option in the magnifying-glass menu