

Setting Up Your Hours Of Operation
Hours of Operation are their own kind of event in the calendar. They serve two purposes: they show your working hours on the calendar, and, more importantly, they define the windows during which patients can book appointments through your online booking page.
In practice, Hours of Operation are the foundation of online booking. Without them, your online booking page has no idea when you’re available, so it can’t offer patients any slots to choose from. A clinic that books exclusively through staff manually in the calendar can run without ever setting Hours of Operation; a clinic that takes online bookings cannot.
Creating Simple Hours Of Operation
Hours of Operation are created the same way as any other event in your calendar. They can be one-off or repeating, they can stop and resume at any point in time, and they can be deleted and moved around.
- Click anywhere in the calendar to open the event editor, titled New Event.
- In the Type of Event box, select Hours of operation. It is usually the last item in the list.
- Set the day, the start and end times.
- Set it to repeat, so the same hours come back every week (see the next section).
- Click Save.
Making Your Hours Repeat Every Week
Most practitioners work the same hours each week, so their Hours of Operation repeat. Once Hours of operation is chosen as the type of event, a repeat box appears under the date and time, showing Does Not Repeat.
- Open the repeat box and choose how often the hours come back. Weekly suits most schedules. The list also offers Daily, Every weekday (Monday to Friday), Every Monday, Wednesday, Friday, Every Tuesday and Thursday, Monthly and Yearly.
- With Weekly, set Every to 1 for every week, or to 2 for every second week.
- Under On, click each day these hours apply to. The days you choose turn blue. If you work the same hours Monday to Friday, choose all five days in one event.
- Under Ends, choose Never to keep the hours going, After to stop after a number of times, or On to stop on a date, for example the start of a holiday.
- Click Save. The hours appear on every day you chose.
If your hours differ from day to day, for example 9 to 5 on weekdays and 10 to 2 on Saturdays, create one repeating Hours of Operation event for each set of hours.
Hours of Operation show as shaded areas behind your regular events on the calendar instead of taking up the foreground, the same way background events do. You can edit them, but you need to double-click them to open the editor (a single click is reserved for regular events).
Seeing Each Practitioner’s Hours
In the day view, each practitioner has their own column, and every practitioner’s Hours of Operation show in their column. In the week, month and other views, the calendar shows one practitioner’s Hours of Operation at a time. To choose whose hours you see, click the small calendar icon next to that practitioner’s name in the sidebar on the left. The icon with a check mark shows whose hours are on screen. Click it again to hide them.
Editing Hours Of Operation
Double-click any Hours of Operation event to open the editor, titled Edit Event.
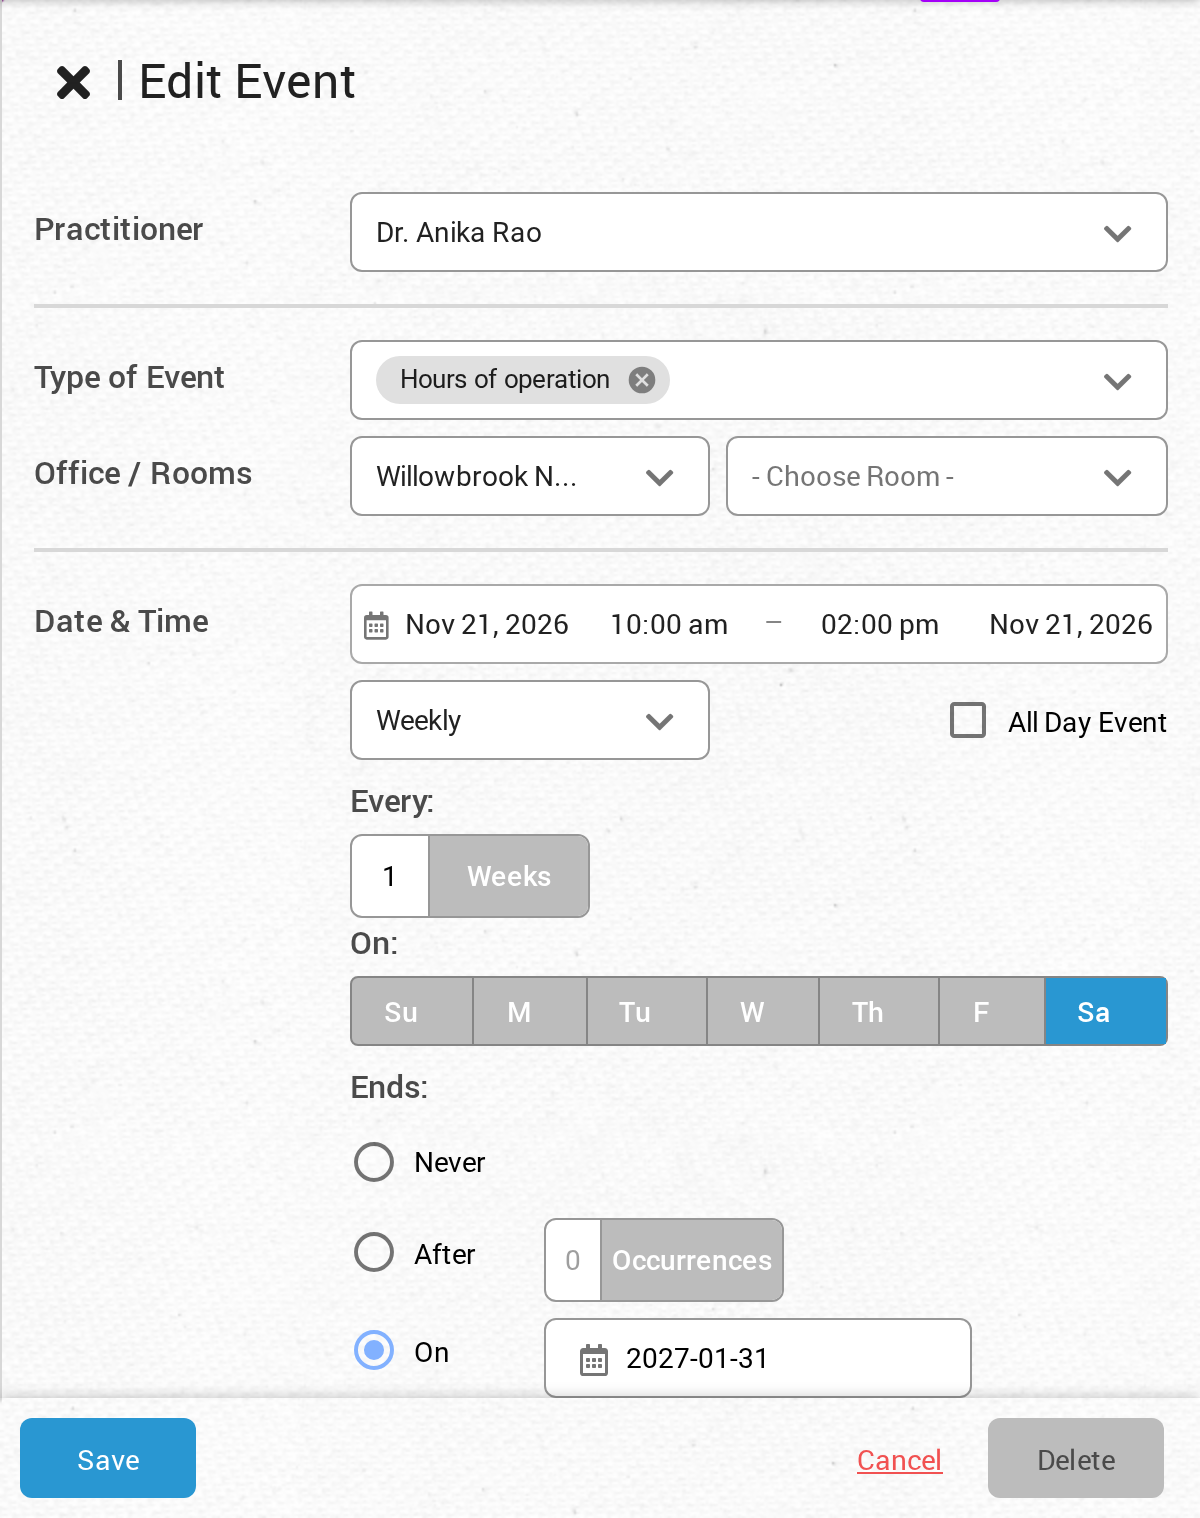
An Hours of Operation event that repeats every Saturday until the end of January.
If you’re changing a repeating series, an Edit Recurring Event dialog asks you to choose which events the change applies to:
- This Event changes only the event you double-clicked. The series splits into the events before, this single event, and the events after.
- This and following events changes this event and every later event in the series. The series splits in two: everything before stays as it was, and everything from this event on takes the new settings.
- All events changes every event in the series, past and future.
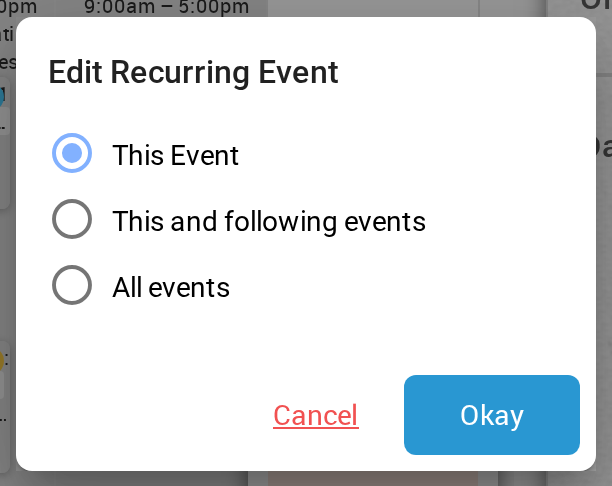
To change the hours for one week only, choose This Event and click Okay.
Blocking Off Your Schedule
Hours of Operation define when you’re available. To block off specific times within those hours, such as vacation, lunch or training, create a non-patient event in the Event Manager (call it “Vacation”, “Lunch”, “Meeting”, or whatever fits), then book it into your calendar like any other event.
A blocked-off event sits on top of your Hours of Operation and prevents online bookings during that time. Staff can still manually book patients into a blocked slot if they need to, because the block only restricts online booking.
How Hours of Operation Drive Online Booking
When a patient lands on your online booking page and picks a service:
- OutSmart looks at the Hours of Operation events that apply to the selected practitioner (and, if you’re using event type or room restrictions, the ones that allow that service).
- Inside those hours, OutSmart subtracts any existing bookings and any blocked-off events.
- What’s left is the patient’s available choices, offered to them according to your Magnetic Booking setting and scheduling interval defaults.
If you’ve set up Advanced Hours of Operation, restricting hours by event type or by room, those rules apply on top of the basic hours.
Related Pages
- Advanced Hours of Operation: restricting hours by event type or by room
- Creating Event Types: including how to create the non-patient event types you use for blocking off time
- General Preferences (Online Booking): Magnetic Booking, breaks between visits, minimum notice