

Deleting & Recovering Events
Understanding Delete vs. Cancel
Before deleting any event, it’s crucial to understand the difference between deleting and cancelling an appointment.
Delete
Deleting an event means:
- The appointment was created by mistake
- The event should never have existed
- It removes the appointment from the calendar view
- It is not counted as a cancellation, no show or other visit
- OutSmart keeps the deleted event, so it can be recovered later through calendar search
Cancel
Cancelling an event means:
- The appointment was valid when created
- The patient cancelled it
- The event stays in the calendar
- Status is marked as “Cancelled”
- A record is maintained for reporting and analytics
When to Delete an Event
Delete an event only in these situations:
Appropriate Reasons to Delete
- Duplicate booking: the same appointment was accidentally created twice.
- Wrong patient: the event was booked for the wrong person by mistake.
- Wrong date/time: the appointment was created at the wrong time and needs to be recreated.
- Test event: you were testing the system and created a practice event.
- Data entry error: the event was created entirely by mistake.
When NOT to Delete
Do not delete an event if:
- The patient called to cancel: use a Cancelled status instead.
- The patient rescheduled: use re-schedule event on the event card instead.
- The patient didn’t show up: use the No Show status instead.
- The appointment is completed: use the Completed status instead.
How to Delete an Event
There are two ways to delete an event from your calendar.
Method 1: From the Event Card
- Click on the calendar icon to open your calendar
- Find the event you want to delete
- Click on the event once to open the event card
- At the top right of the event card, click the trash can icon
- The event is removed from the calendar straight away and an Event Deleted message appears. OutSmart does not ask you to confirm first.
Method 2: From the Event Editor Panel
- Click on the event once to open the event card
- Click the pencil icon (edit) at the top right
- The event editor panel opens on the right side
- Click the delete button at the bottom right of the panel
- The event is removed from the calendar straight away. OutSmart does not ask you to confirm first.
What Happens When You Delete
When you delete an event:
- The event disappears from the calendar view immediately
- It cannot be seen in normal calendar browsing
- It does not appear in calendar searches unless you turn on Include deleted events?
- The event is not permanently removed. It is marked as deleted.
- It can be recovered using calendar search
Recovering Deleted Events
If you accidentally deleted an event, you can recover it using calendar search.
Step-by-Step: How to Recover a Deleted Event
Follow these steps to find and restore a deleted appointment:
Step 1: Open Calendar Search
- Click the calendar icon at the top right of your screen
- Your calendar view opens
- Click the magnifying glass button at the top right of the calendar. A short menu opens.
- Click Search Calendar. The Search Calendar page opens in place of the calendar. Its back button returns you to the calendar.
Step 2: Turn On Deleted Events
-
Click “Advanced Search” below the search box
-
The advanced search filters appear: Practitioner/Staff, Patient, Status, Include deleted events? and Date
-
Turn on the “Include deleted events?” switch
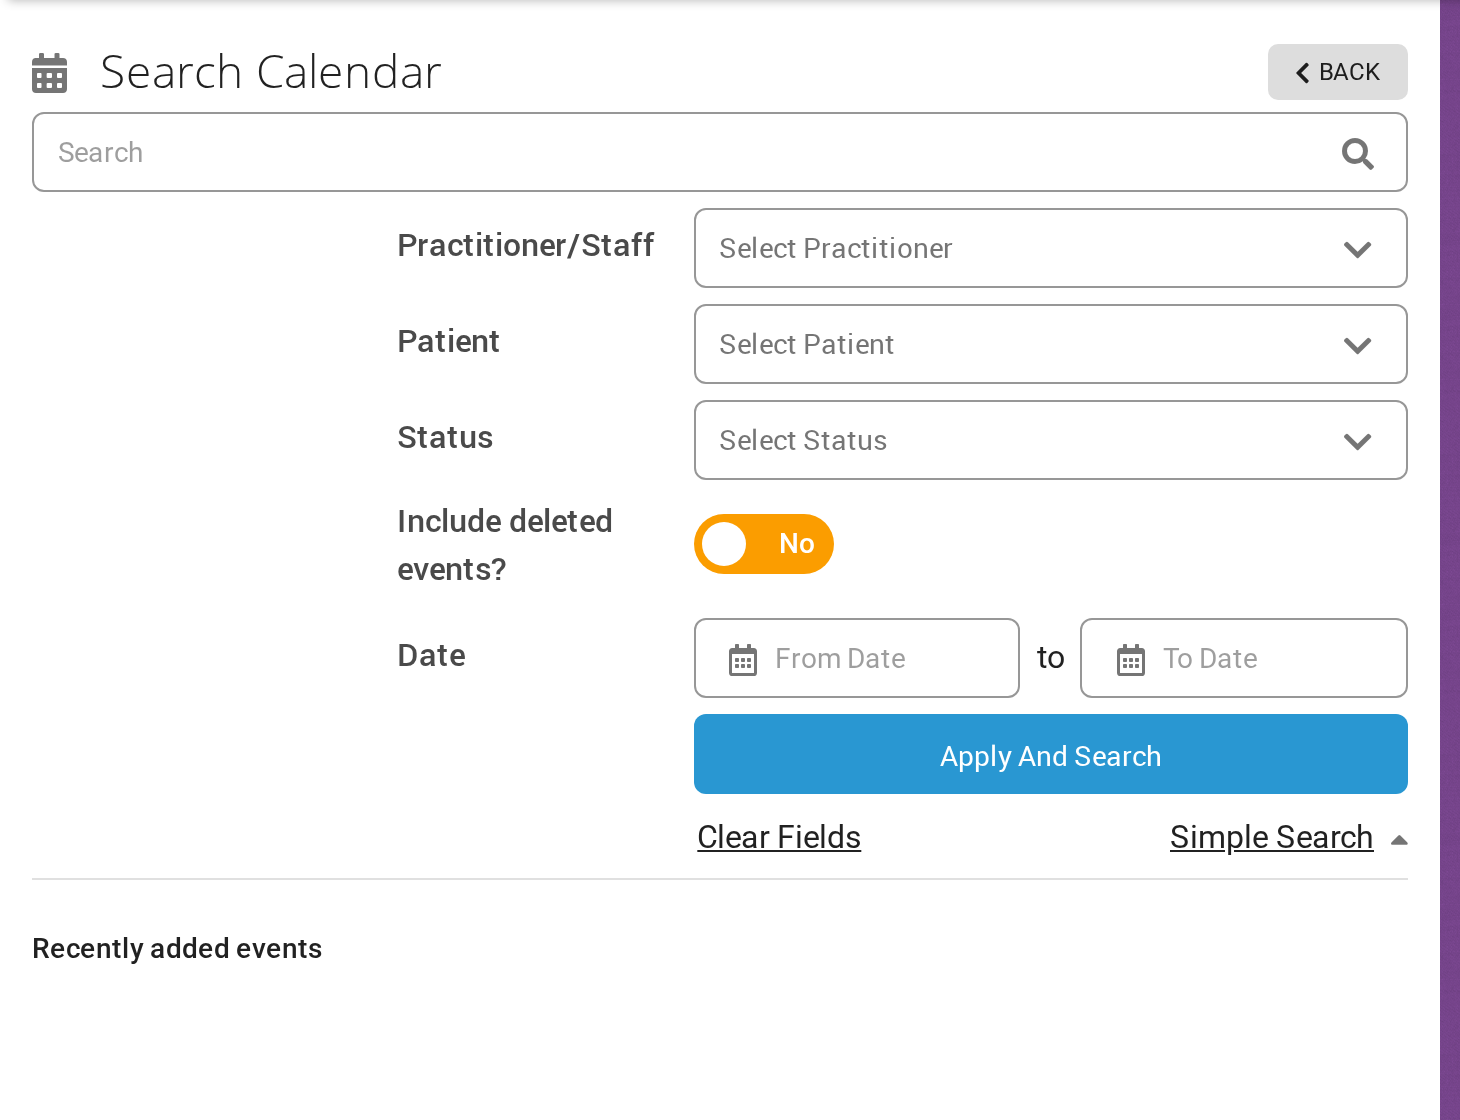
Turn on the Include deleted events? switch so that deleted events appear in your search results.
-
This switch is essential: deleted events won’t appear without it
Step 3: Search for the Event
- Type in the Search box to find the deleted event. The search box matches the patient’s name or email address, the practitioner’s name, the office name, and the event’s title and description.
- Use the advanced filters if needed, for example a practitioner, a patient or a date range
- Click apply and search, or press Enter in the search box
Step 4: Find the Deleted Event in Results
Search results will show all matching events, including deleted ones:
- Look for events with “Deleted” under the date and time. Deleted events have no colour bar at their left edge.
- Check the date and time to identify the right event
- Verify the patient name
- Click on the deleted event to select it
Step 5: Restore the Event
For a patient appointment:
- The event card opens beside the search results
- In the card’s coloured header, you’ll see the status shows “Deleted”
- Click the status dropdown where it says “Deleted”
- Select a new status (usually “Pending” to restore it)
- The event is restored to the calendar straight away and an Event Updated message appears
For a non-patient event, such as a break, the event card has no status dropdown:
- On the event card, click the pencil icon. The calendar opens with the event editor panel.
- In the Status field, select a new status, such as “Pending”
- Click Save
Recovering Events: Complete Workflow
Here’s the complete workflow in one place:
- Open Calendar → Click calendar icon
- Open Search → Click the magnifying glass button, then Search Calendar
- Advanced Search → Click “Advanced Search” link
- Turn On Deleted Events → Turn on the “Include deleted events?” switch
- Search → Enter the patient name or other search terms, then click apply and search
- Find Event → Look for an event with “Deleted” status
- Click Event → Opens the event card
- Change Status → Click the status dropdown, select “Pending” (for a non-patient event, click the pencil, change Status and click Save)
- Event Restored → Appointment appears back in calendar
After Recovering an Event
Once you’ve restored a deleted event:
Verify the Event Details
- Check the date and time are correct
- Verify patient information is accurate
- Confirm practitioner assignment is right
- Review any description notes
Notify the Patient (If Needed)
If the patient should be informed:
- Click “Save & Send” in the event editor panel, or click Send Confirmation on the event card that opens when you click the event once in the calendar.
- Patient receives confirmation with appointment details
- Any intake forms or custom emails are sent
Make Any Necessary Edits
While the event details panel is open:
- Update any information that needs changing
- Add notes about the deletion/recovery
- Adjust date/time if needed
- Click Save when done
Common Recovery Scenarios
Accidentally Deleted Today’s Appointment
- Open Search Calendar
- Click Advanced Search
- Turn on “Include deleted events?”
- Set the date range to today
- Find and restore the event
Deleted Wrong Patient’s Appointment
- Open Search Calendar
- Turn on “Include deleted events?”
- Search by patient name
- Find the deleted appointment
- Change status to “Pending”
Deleted Event from Last Week
- Open Search Calendar
- Advanced Search → turn on “Include deleted events?”
- Set the date range to last week
- Search by practitioner or patient
- Restore the event
Delete vs. Cancel: Quick Reference
| Scenario | Action | Why |
|---|---|---|
| Patient called to cancel | Cancel Status | Track cancellations for reporting |
| Duplicate booking | Delete | Remove the mistake |
| Patient no show | No Show Status | Track attendance patterns |
| Booked wrong patient | Delete | Correct the error |
| Patient rescheduled | re-schedule event | Automatic tracking |
| Test/practice booking | Delete | Remove test data |
| Appointment completed | Completed Status | Maintain visit history |
| Wrong date/time | Delete & Rebook | Fix the mistake |
Troubleshooting
Can’t Find the Deleted Event
If you can’t find a deleted event in search:
- Verify the “Include deleted events?” switch is turned on
- Expand date range to cover more time
- Try different search terms (patient name, practitioner, etc.)
- Check spelling of patient or practitioner names
- Search with partial names (first name only)
Event Won’t Restore
If changing the status doesn’t restore the event:
- Ensure you selected a valid status (Pending, Confirmed, etc.)
- For a non-patient event, click Save in the event editor panel after changing the status
- Refresh the calendar view
- Try reopening the event from search results
Restored Event in Wrong Place
If the restored event appears at the wrong time:
- Click on the event to open event editor
- Edit the date/time manually
- Or drag and drop to the correct time
- Click Save to update
Summary
Remember these key points:
- Delete is for mistakes: use it when the appointment shouldn’t exist.
- Cancel is for patient cancellations: use it to track cancellations.
- Deleted events can be recovered: use Search Calendar with “Include deleted events?” turned on.
- To recover an event, change its status from Deleted to Pending.
- Always double-check: OutSmart deletes an event as soon as you click the trash can, without asking first.