

Calendar Options
The Calendar Options panel is where you configure how your calendar looks and behaves. It controls things like the colors of your events, the time range shown on the calendar, what happens when events overlap, and whether cancelled events are visible.
Opening Calendar Options
- Open the Calendar by clicking the calendar icon at the top right of any page.
- Click the gear icon at the top right of the calendar.
- From the settings menu that appears, select Calendar Options.
- The Calendar Options panel opens.
Changes in this panel do not take effect until you click Save at the bottom of the panel. Click Cancel to close the panel without keeping your changes.
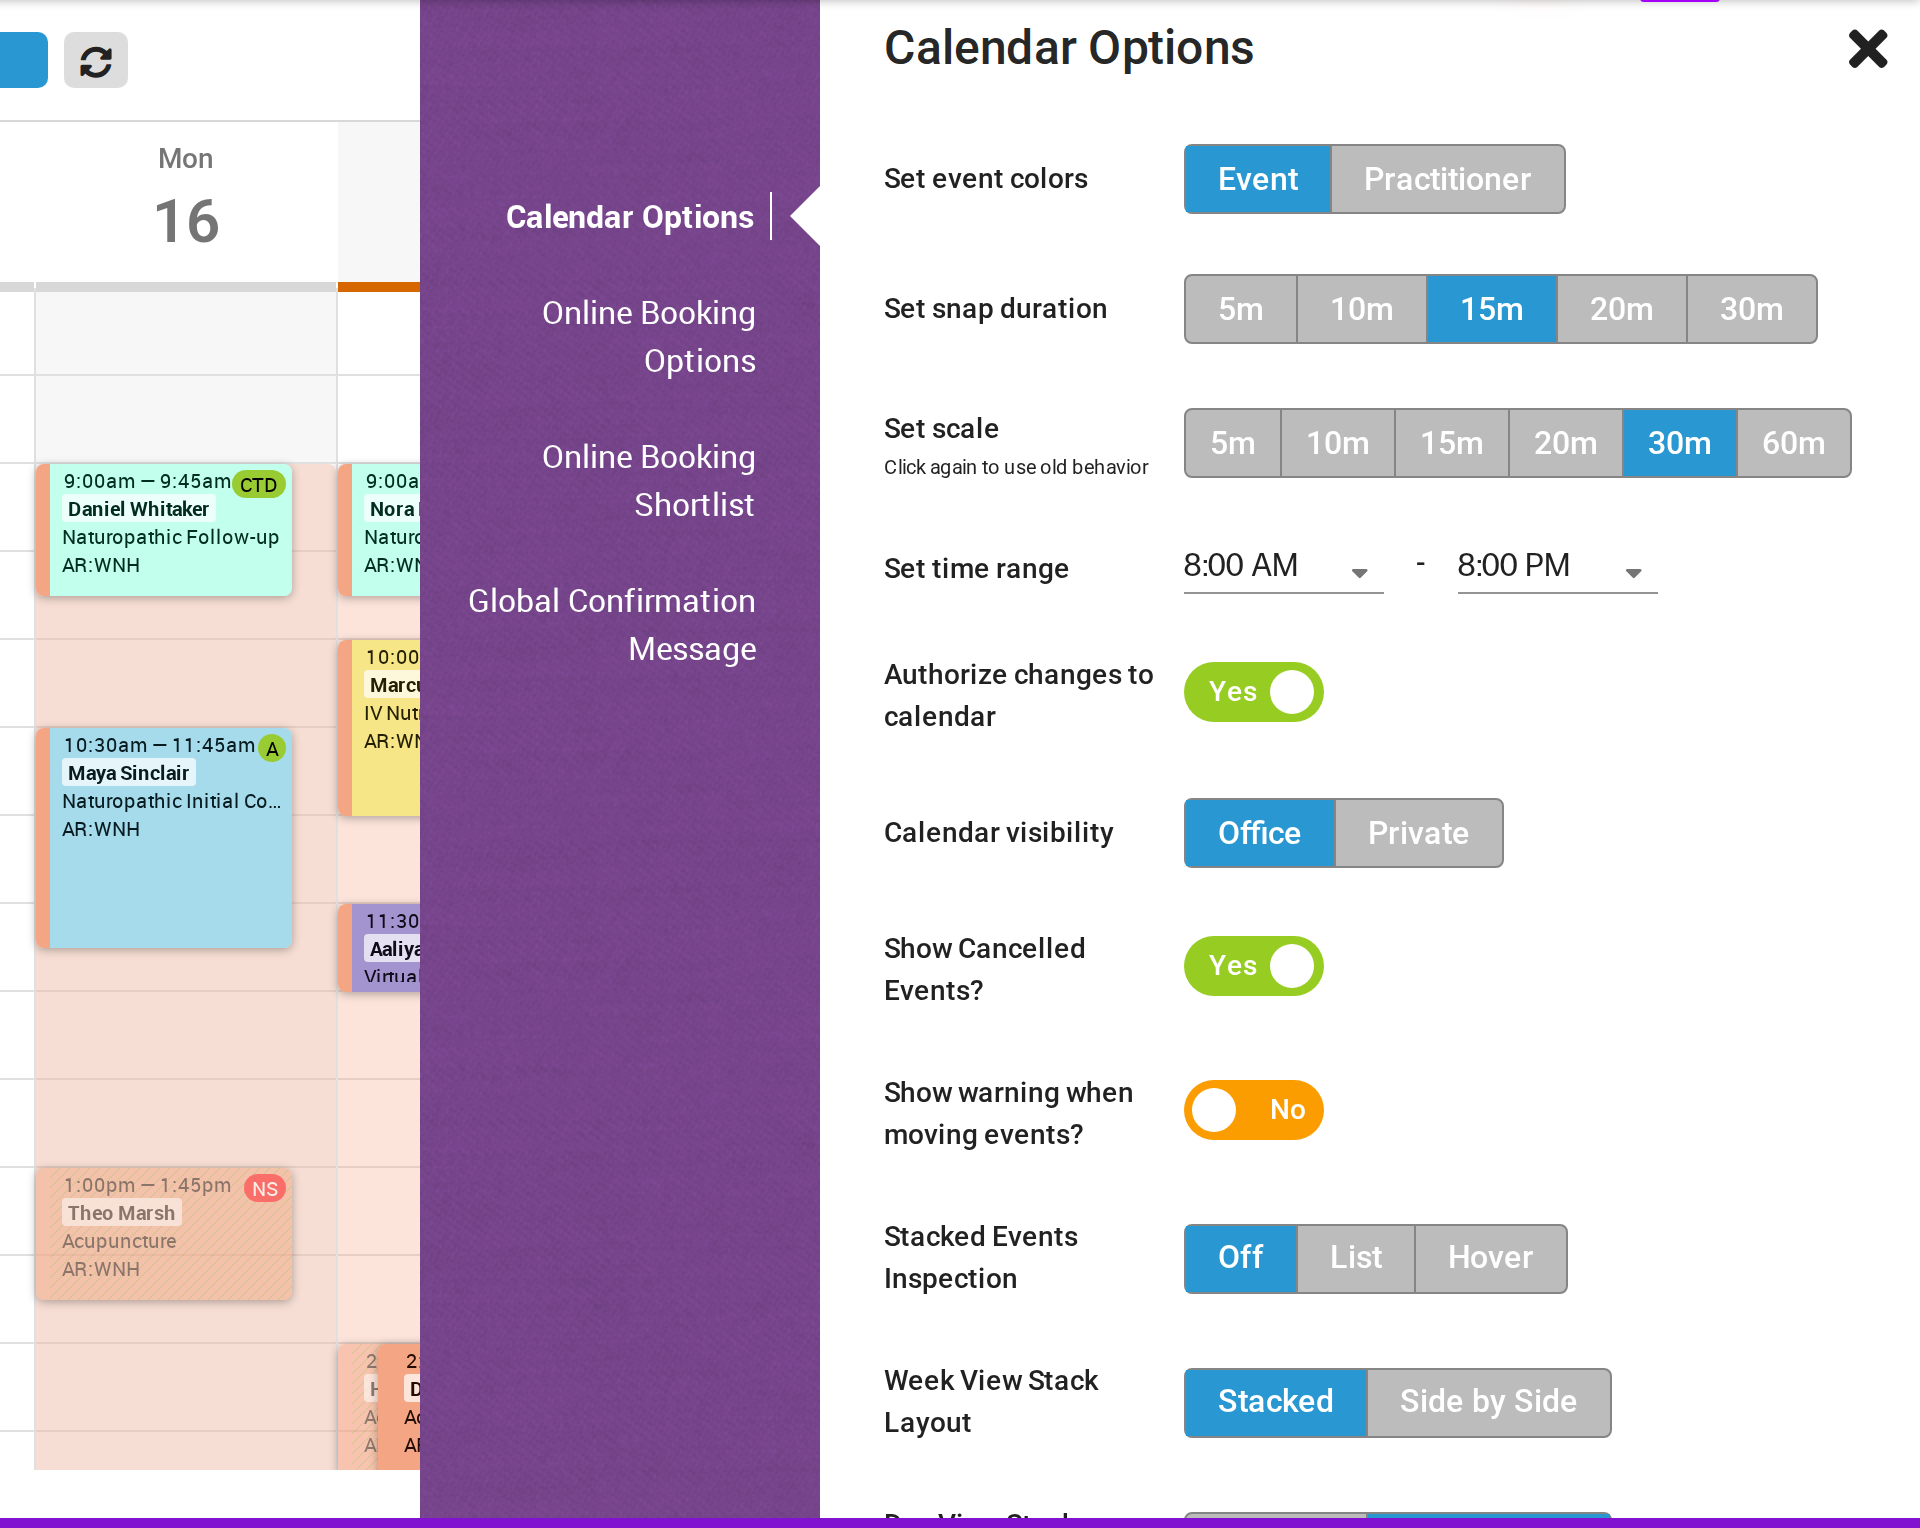
The Calendar Options panel opens from the gear menu and holds the settings that control how your calendar looks and behaves.
Set Event Colors
This setting chooses which colour each event is drawn in on the calendar. There are two options:
- Event (default) draws each event in the colour of its event type.
- Practitioner draws each event in the colour of the practitioner it is booked with. You pick each practitioner’s colour with the colour box beside their name in the calendar sidebar.
Pick the option that gives you the best at-a-glance read of your schedule.
Set Snap Duration
When you drag an event to a new time on the calendar, the event “snaps” to a time interval. This setting controls how fine that snap is.
- 5m (default) is the finest and lets you drop events at any five-minute mark.
- 10m drops events at ten-minute marks.
- 15m drops events on the quarter-hour.
- 20m drops events at twenty-minute marks.
- 30m drops events on the half-hour.
Smaller snap durations give you more precision but make accidental small movements more likely.
Set Scale
This setting controls the zoom level of the calendar, which is how much vertical space each hour takes up on screen. The options are 5m, 10m, 15m, 20m, 30m and 60m. Each option sets how many minutes one row of the calendar covers.
- A smaller number, such as 5m, gives each hour more height. Events are easier to read, but you scroll more to see the whole day.
- A larger number, such as 60m, fits more of the day on screen but makes each event smaller.
No scale is chosen at first. When no scale is chosen, the row size follows your snap duration. To go back to that, click the scale option that is currently chosen a second time to clear it.
Set Time Range
This setting chooses the start and end times shown on your calendar, for example 7:00 AM to 8:00 PM. By default the calendar shows the whole day. The calendar does not draw the hours outside the range you choose, which is useful if you never book outside business hours and want to skip the empty space.
Authorize Changes to Calendar (Practitioners only)
This setting controls whether other practitioners at your office can book and change events on your calendar.
- Yes (default) lets other practitioners book and change events on your calendar.
- No means other practitioners can see your calendar but cannot book or change events on it.
Only practitioners see this setting. It does not apply to admin staff: admin staff can always book and change events on the calendars in their office.
Calendar Visibility (Practitioners only)
This setting controls whether other practitioners at your office can see your calendar.
- Office (default) lets other practitioners see your calendar and add it to their sidebar.
- Private hides your calendar from other practitioners. In their Master Calendar List, your name shows an eye with a line through it instead of a checkbox, and they cannot add your calendar to their sidebar.
Admin staff can always see every calendar in their office, whatever this setting says. Only practitioners see this setting. To learn more about the sidebar, see Calendar Master List and Short List.
Show Cancelled Events?
This setting controls whether cancelled appointments stay visible on your calendar or are hidden from view.
- Yes (default) keeps cancelled events on the calendar, drawn in a cancelled style so you can tell them apart from active events.
- No removes cancelled events from the calendar view. They are still kept in OutSmart, and you can find them with Calendar Search by choosing a cancelled status in the Status filter.
Many clinics find it useful to see cancelled appointments at a glance, both to spot free time (for example, when a 2 PM appointment has cancelled) and to notice cancellation patterns. Others prefer a cleaner calendar with cancelled events hidden.
Show Warning When Moving Events?
When you drag and drop an event to a new time, the calendar can either move it silently or show a confirmation popup first.
- Yes shows a confirmation popup before each move, which protects you against accidental drags.
- No (default) moves events as soon as you drop them, which is faster but makes mistakes easier.
If you’ve ever accidentally moved an event by clicking and dragging when you meant to just click, turn this on.
Stacked Events Inspection
When two or more events are scheduled at the same time, they stack on top of each other on the calendar. This setting controls what happens when you interact with a stacked event: how you peek at or open the events that aren’t on top. To control how those overlapping events are drawn on the calendar in the first place, see Stack Layout below.
There are three modes, shown on screen as Off, List and Hover:
| Mode | Behavior |
|---|---|
| Hover (default) | Mouse over a stacked event to peek at it. A small read-only summary appears showing the patient, time, type, practitioner, office, and status. Click the event to open the full appointment card as normal. |
| List | Click a stacked event to open a popup listing all events at that time. Pick the one you want to open. |
| Off | Nothing special happens with stacked events. Clicking opens the topmost event’s normal appointment card; the other stacked events stay hidden underneath. |
Hover mode (default)
When you mouse over an event that has others stacked at the same time, a small read-only card pops up above the event. It shows:
- Patient name (or event type if there’s no patient) and the date and time range at the top
- The event type and the practitioner on the next line
- Office below that
- Status at the bottom, in red and bold when the appointment is cancelled
The card is read-only, so you can’t click anything in it. It’s just for quickly seeing what’s underneath without having to click. Click the event itself to open the full appointment card as usual.
The hover card only appears for events that have other events stacked with them. Standalone events don’t trigger it.
List mode
Clicking a stacked event opens a popup listing every event at that time slot. Each row shows the patient, time, type, practitioner, and status (red and bold for cancelled). Click any row to open that event’s full appointment card.
Off mode
Stacked events are not flagged in any special way. Clicking opens the topmost event’s appointment card. To see the events underneath, you’d need to use Calendar Search or rely on the colour bar at the top of stacked events as a visual hint.
What stacked events DON’T include
Whichever mode you choose, the hover card and the List popup only show events you can actually see on the calendar. They respect:
- Your practitioner sidebar selection: if you’ve hidden a practitioner, their stacked events won’t appear in the popup or the hover card
- Your Show Cancelled Events? setting: if it is set to No, cancelled events are excluded
- Deleted events are always excluded
This means the inspection popup won’t surprise you with events you can’t see on the calendar.
Choosing a mode
- Hover is the easiest, because no clicks are needed to see what’s underneath. It is best for everyday use.
- List is best when you frequently need to open stacked events, not just see them. The popup gives you a clickable list.
- Off is best if you find the hover card or the List popup distracting and prefer a quieter calendar.
Stack Layout
When events overlap in time, the calendar can draw them in two different shapes. Stack Layout controls the shape. It is separate from Stacked Events Inspection above, which controls how you interact with the stack once it’s drawn.
There are separate settings for Week View and Day View so you can pick the layout that suits each view. Month view and the multi-day overview views always draw overlapping events stacked, and this setting does not apply to them.
| Layout | What overlapping events look like |
|---|---|
| Stacked (default) | Events cascade: each subsequent event sits a little to the right of the one behind it, with the events underneath poking out as thin slivers on the left. Compact for many short overlaps. |
| Side by Side | Events split the column width: each overlapping event takes an equal fraction of the column and sits next to its peers. Every event title is fully readable without clicking or hovering. |
Picking a layout per view
- Week View Stack Layout controls the weekly grid.
- Day View Stack Layout controls the day view (whether you reached it from the Day button on desktop or the mobile day view).
The two settings are independent. A common combination is Side by Side for Day View (where one or two overlaps per slot is common and you want to read each event at a glance) and Stacked for Week View (where many short overlaps are common and a compact cascade is easier to scan).
Stacked layout
Each overlapping event is drawn slightly to the right of the one behind it. The gap between events adapts to how many events are overlapping, with smaller gaps for deeper stacks, so you can fit more events into the same space.
- Pros: compact; works well with many short overlaps.
- Cons: events behind the front-most one show as thin slivers; you can’t read the patient name on a back event without hovering or clicking.
Side by Side layout
Every overlapping event takes an equal fraction of the column width and sits next to its peers. With two concurrent events, each takes half the column; three takes a third each; and so on.
- Pros: every event is fully readable at a glance without hovering or clicking.
- Cons: the more events overlap, the narrower each one becomes. A deep stack of many short events can make individual events very thin.
Calendar List Display Order
This setting controls the order in which practitioners appear in the calendar sidebar, which is the list on the left side of the calendar showing which practitioners’ calendars are loaded. There are three options:
- Default
- Alphabetical, First Name
- Alphabetical, Last Name
Related Pages
- Calendar Overview: what the calendar is and how it’s organized
- Calendar Master List and Short List: how to control which practitioners appear in your sidebar
- Booking Events: how to create new appointments
- Editing Events: how to change appointment status, including cancelling
- Calendar Search: how to find cancelled or deleted events that don’t show on the calendar