

The Waitlist Dashboard Card
The Waitlist Dashboard Card is where you and your staff work the waitlist day to day. It lists every active entry, marks each one by whether matching openings exist in your calendar, and gives you quick ways to contact the patient, book them in, or remove the entry.
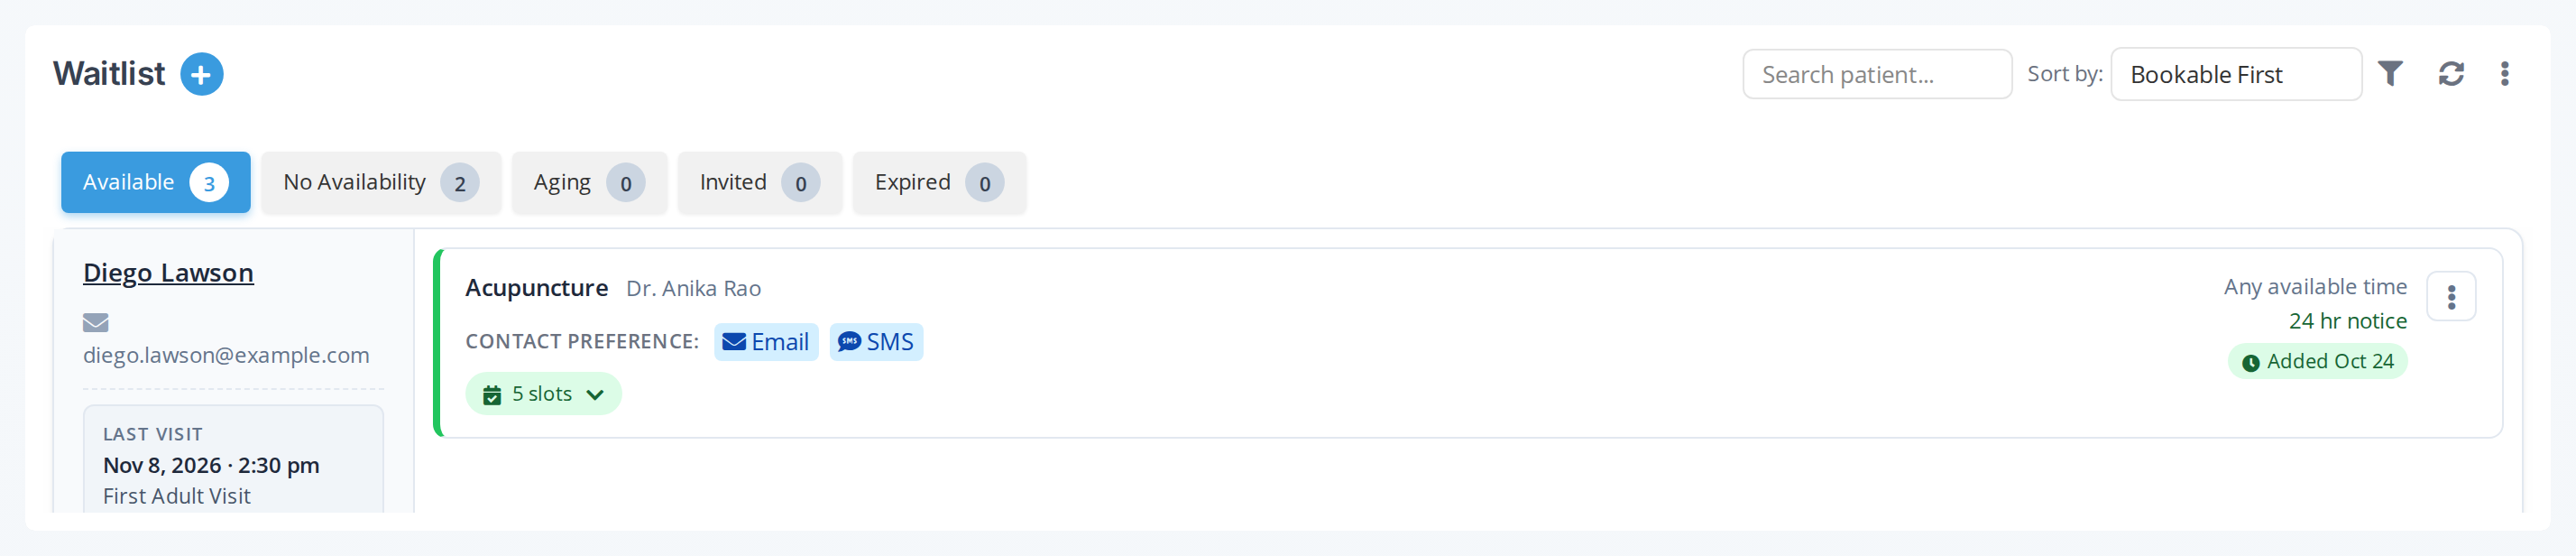
The Waitlist card. An entry with a green left border has matching open times in the calendar.
Adding the Card to Your Dashboard
Any practitioner or admin can add the Waitlist card to their dashboard. No special permission or admin help is needed. Adding the card is all you need to do to start managing waitlist entries.
The card is added the same way as any other dashboard card:
- From the Dashboard, click the Dashboard Cards Menu at the top.
- Select Waitlist from the list of available cards.
- The card is added to your dashboard. You can drag it by its header to move it.
Card Header
The header at the top of the card holds the controls for finding and organizing entries.
| Control | Purpose |
|---|---|
| + button (round, blue, beside the Waitlist title) | Opens the Add to Waitlist panel for creating a new entry |
| Search patient… | Finds entries by patient name |
| Sort by | Changes the order of the entries (default: Bookable First) |
| Funnel (Filters) icon | Opens the filter panel for narrowing by practitioner and appointment type |
| Refresh icon | Checks the live calendar again for matching times |
| More Options icon (three dots) | Opens a menu with Help, which explains the tabs and colours, and Remove Card |
Sorting
Click the Sort by dropdown to change how entries are ordered:
- Bookable First (default): entries with matching openings come first, followed by entries with no matches. Within a group, higher-priority entries come first.
- Date Added: newest entries first.
- Patient Name: alphabetical by patient last name.
Filtering
Click the funnel icon to open the filter panel. The filters you see depend on your role:
| Role | Filters Available |
|---|---|
| Admin staff | Practitioners (choose one or more) and Appointment Type |
| Practitioner | Appointment Type only (you always see only your own entries) |
Selecting one or more practitioners limits the Appointment Type list to the types those practitioners offer. Click Apply Filters to update the list.
Searching
Type a patient’s first or last name in the Search patient… box and press Enter. The card shows the matching entries on the tab you’re on, together with any filters you’ve applied.
The Tabs
Just below the header, tabs let you switch between views of the waitlist. Each tab shows a count of the entries in that view across the whole list, not just the entries loaded on screen. The tabs appear in this order:
| Tab | What It Shows | When to Use It |
|---|---|---|
| Available | Entries with matching times in the next 6 months | Your daily action list: these patients can be booked now |
| No Availability | Entries with no matching times in the next 6 months | Look again when your schedule changes, or contact the patient to widen their preferences |
| Aging | Entries with no matching times that were added more than 180 days ago | Clean-up: call these patients to check they still want to wait, or remove them |
| Invited | Booking links you’ve sent from the waitlist, and what happened to each | Follow up on, resend, or withdraw an offer |
| Expired | Entries whose Until date has passed, or whose appointment type no longer exists | Edit them to bring them back, or cancel them |
The Invited tab
This tab lists invitations, not entries. Each row is one offer of a specific appointment time, with Resend, Copy link and Cancel on offers that are still live, and Clear on ones that are finished.
While a patient has an outstanding invitation, their entry drops off the Available tab, so nobody offers the same patient a second time. It returns on its own if the offer lapses, and immediately if you cancel it. When the patient books, the entry is marked as booked and leaves the list.
Finished invitations, whether booked, cancelled or expired, stay on the tab for 7 days and then clear themselves. Nothing is lost when a row disappears: a booked one has a real appointment behind it, on the calendar as normal.
The entry’s badge tells you where an offer stands at a glance: Invited, Booked by patient, or Invitation expired. Click the badge to open that entry’s log.
For sending one, see Sending a Booking Link. For invitations sent from the calendar as well as the waitlist, see the Booking Invitations card.
Patient Rows
Each row groups all of a patient’s waitlist entries together, with the patient’s details on the left and one or more entries on the right.
The patient details on the left include:
- Patient name: click it to open the Patient Workspace.
- Phone and email.
- Last visit: the patient’s most recent appointment (date, type and practitioner).
- Next visit: the patient’s next upcoming appointment, when they have one.
- Appointment History button: opens a panel listing every past and upcoming appointment for this patient. The button only appears when the patient has at least one appointment. Otherwise the row says “No appointments on record.” See Managing Waitlist Entries.
Click the Last visit or Next visit box to open the details of that appointment. See Managing Waitlist Entries.
Entries
Each entry on the right of a patient row is a single waitlist entry: one appointment type, one or more practitioners, and one set of preferences.
Each entry shows:
- Appointment Type and Practitioner(s).
- Contact Preference: the blue Email and SMS buttons (and the phone number, if the patient chose Phone Call) show how the patient wants to be reached. Click the blue Email or SMS button to send the patient a message. See Notifying a Waitlist Patient.
- Slot badge: shows what the availability check found.
- N slots (green), for example 12 slots: matching times exist. Click it to show the list of times.
- No slots: no matching times in the next 6 months.
- Check manually: OutSmart couldn’t work out the availability for this entry. Look in the calendar yourself.
- Preferred times: “Any time”, or a summary of the chosen days and periods (for example, “Tue AM, Wed PM”).
- Minimum notice: how much advance warning the patient needs (for example, “24 hr notice”).
- Date range: the From and Until dates, when the entry has them.
- Added label: when the entry was created, colour-coded by age:
- Green: added within the last 90 days.
- Orange: added 90 to 180 days ago.
- Red: added more than 180 days ago.
Entry Colour Key
The coloured left border on each entry shows its bookability at a glance:
| Border Colour | Meaning |
|---|---|
| Green | Matching times found within the next 90 days |
| Orange | Matching times found, but the earliest is more than 90 days away |
| Red | No matching times found in the next 6 months |
| Light grey | OutSmart is still checking availability |
| Darker grey | The availability couldn’t be worked out (the entry shows Check manually) |
When an entry’s appointment type no longer exists, a red Type deleted — not bookable label appears beside the type name and the entry moves to the Expired tab. When the type has been deleted but can still be booked, a Deleted type label appears instead. See Managing Waitlist Entries.
Entry Actions
Each entry gives you a few ways to act: the blue Email and SMS buttons beside Contact Preference, the list of matching times, and the three-dot actions menu at the top right.
- Notify the patient: click the blue Email or SMS button beside Contact Preference to send an email or text about a possible opening. See Notifying a Waitlist Patient.
- Click a matching time: opens the Book this appointment? panel. See Booking a Patient From the Waitlist.
From the three-dot actions menu you can:
- Mark as Booked: mark the entry as booked when the patient was booked some other way. See Managing Waitlist Entries.
- Edit: change the entry’s practitioner(s), appointment type, preferences, notice, or notes. See Managing Waitlist Entries.
- Cancel Entry: remove the entry. See Managing Waitlist Entries.
- View log: opens the activity log for this entry: every edit, status change, and message sent. See Managing Waitlist Entries.
Loading More Entries
The card loads entries a page at a time. At the bottom of the list, Showing X of Y tells you how many entries are loaded out of the total on that tab. Click Load More to load the next page.
Refreshing the Card
The card checks availability when you load the dashboard. To check again (for example, after you’ve cancelled an appointment and want the freed time to appear), click the refresh icon at the top right of the card header.
Mobile Layout
On smaller screens, or when the card is placed in a narrow column, the layout changes:
- The search box and Sort by move to a second row in the header.
- The Aging tab is hidden. Available, No Availability, Invited and Expired still show.
- The patient details sit above the entries instead of to the left.
- Entries are shown in a single column.
Troubleshooting
My patient added themselves through online booking but I don’t see them on the card
- Make sure the patient-side Join Waitlist link is turned on for your online booking page. If that setting is off, patients can’t add themselves through online booking, but your staff can still add entries from the dashboard card.
- Check the Expired tab. If the patient’s Until date has passed, or the appointment type they picked no longer exists, their entry is there.
- If you’re logged in as a practitioner, you only see entries assigned to you. Log in as an admin to see every entry in the office.
An entry shows red even though I know I have openings
- Red means no matching times on the patient’s preferred days and periods in the next 6 months. Their preferences may be narrow.
- Click Edit on the entry to widen the days and periods, or switch to Any available time (ASAP).
- Anything more than 6 months away doesn’t show up, because OutSmart only looks 6 months ahead.
The card shows “all slots taken” when I expand the slots
The availability check found openings, but they’ve been booked by someone else since the card loaded. Click the refresh icon to check again, or look directly in the calendar.
Related Pages
- Adding a Patient to the Waitlist
- Notifying a Waitlist Patient
- Sending a Booking Link
- Booking a Patient From the Waitlist
- Managing Waitlist Entries
- Find Availability Tool: search the calendar for times matching a patient’s preferences
- Waitlist Overview