

Managing Waitlist Entries
Beyond booking and notifying, the Waitlist Dashboard Card lets you look after the list itself: adjust entries as patient needs change, remove entries that no longer apply, and review every action taken on an entry. This article covers all of those tasks in one place.
The Entry Actions Menu
Most of these tasks start from the three-dot actions menu at the top right of an entry. The menu is the same on every tab, including Expired, and contains:
| Action | Use It To |
|---|---|
| Mark as Booked | Mark the entry as booked when the patient was booked some other way |
| Edit | Change the practitioner, type, preferences, notice, or notes |
| Cancel Entry | Remove the entry from the active list |
| View log | See every action taken on this entry |
To notify a patient, use the blue Email and SMS buttons beside Contact Preference on the entry itself, not this menu. See Notifying a Waitlist Patient.
Editing an Entry
Click Edit to open the Edit Waitlist Entry panel. It has the same fields as the Add to Waitlist panel, with every field filled in from the existing entry.
You can change:
- Practitioner(s): admin staff only. Practitioners can only edit their own entries.
- Appointment Type
- Availability: switch between Any available time (ASAP) and Specific days/times only
- Days & Times grid: change which days and periods match
- From and Until dates
- Minimum notice
- Notify by
- Notes
Click Save Changes to apply. The system checks the calendar again against the new preferences, and the colour on the entry updates to match.
When the appointment type has been deleted
- If someone deleted the entry’s appointment type, the entry shows a Deleted type warning but stays on its usual tab and can still be booked and saved. Edit it to choose a current appointment type if you want to.
- If the appointment type no longer exists at all, the entry shows Type deleted — not bookable and sits on the Expired tab. Edit it and choose a current appointment type to bring it back, or cancel it.
Mark as Booked
Use Mark as Booked when a patient was booked into an appointment some way other than the dashboard card, for example when you created the appointment in the calendar after a phone call.
OutSmart asks you to confirm in a panel titled Mark as Booked?. Click Yes, Mark as Booked to go ahead. This action:
- Marks the entry as booked.
- Removes the entry from the active list.
- Does not create a calendar appointment.
To book the appointment and mark the entry as booked in one step, click a matching time on the entry instead. See Booking a Patient From the Waitlist.
Cancelling an Entry
Click Cancel Entry to remove the entry from the active waitlist. OutSmart asks Cancel Waitlist Entry?. Click Yes, Cancel Entry to remove it, or No, Keep Entry to leave it as it is.
- The entry is marked as cancelled and disappears from the dashboard.
- The activity log keeps a record of the entry and its cancellation.
- The patient is not told. If you need to tell them, send a separate message before cancelling.
Cancel an entry when the patient no longer wants to be on the waitlist, has been booked elsewhere, or was added by mistake.
Viewing the Entry Log
Every entry has a full activity log. Click View log in the three-dot menu to open the Waitlist Entry Activity Log panel. It lists every action taken on the entry: when it was created, every edit, every status change, and every message sent or blocked.
Each log row shows:
- Date and time of the action
- Who performed it
- What happened: created, edited, notified, status changed, and so on
- A coloured status label, such as sent, blocked or success
- Details about the action
For email messages, a View Email button opens the email that was sent, formatted exactly as the patient received it.
The activity log can’t be edited.
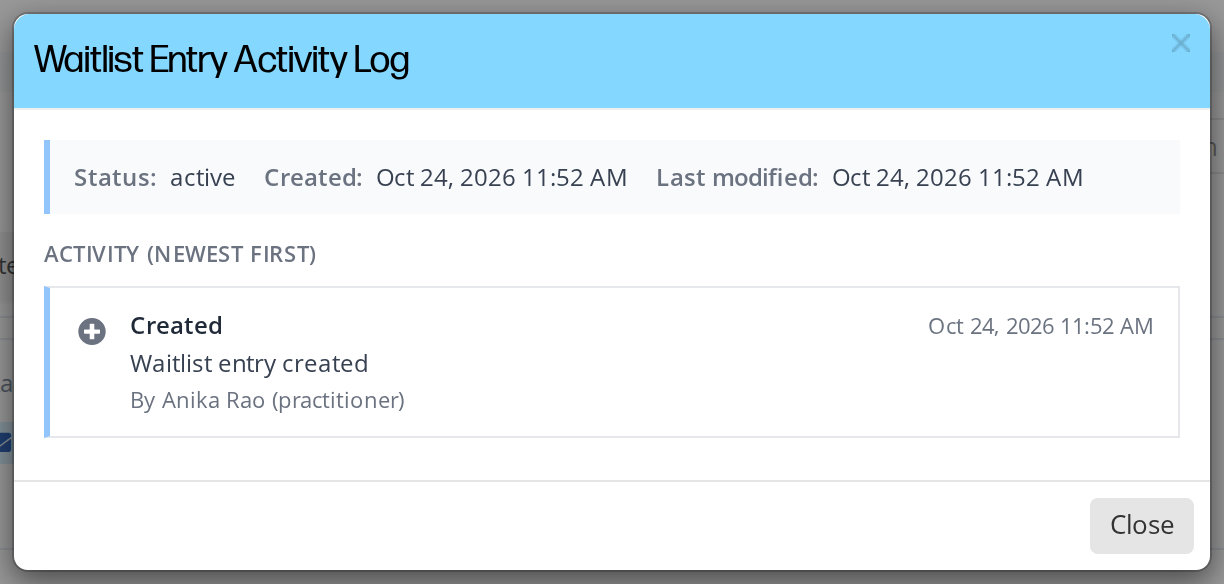
The activity log lists every action taken on a waitlist entry, newest first.
Appointment History
When a patient has past or upcoming appointments, their row on the dashboard card shows an Appointment History button in the patient details on the left. Clicking it opens a panel listing every appointment for that patient, past and upcoming. Patients with no appointments show “No appointments on record.” instead, and no button.
The panel has three columns:
| Column | Contents |
|---|---|
| Appointment | Practitioner, visit type, appointment date and time, status, and a View in Calendar button |
| Details | Booked by (who booked it and when), Last modified by (who last changed it and when) |
| Notes | The start of the appointment description. Click More to read the full notes. |
Appointment Status Colours
The status text in the Appointment column is colour-coded:
- Green: the patient attended (Attended, Attended Late, Completed).
- Red: the appointment didn’t or won’t happen (No Show, Canceled with notice, Canceled without notice, Cancelled, Rescheduled, or deleted).
- Blue: every other status, such as Pending, Booked, Reminded, Confirmed, Left Message or Checked-In.
Appointments a patient booked through online booking without a staff member show Guest / Patient in the Booked by column.
Last Visit and Next Visit
The patient details on the left of a row can show a Last visit box and a Next visit box, each with the date, type and practitioner. Clicking either box opens a panel about that appointment, with:
- Patient name, phone and email
- Date and time
- Practitioner and appointment type
- Notes
- A status dropdown, so you can change the appointment’s status from this panel
For future appointments, the panel also has an Actions dropdown with:
- Cancel Appointment: sets the status to cancelled.
- Cancel and Notify Patient: cancels the appointment and sends the patient the standard cancellation notice, the same one the calendar sends when you cancel an event there.
If the patient has no email or phone on file, Cancel and Notify Patient still cancels the appointment, then tells you that no message could be sent and gives you a link to open the patient’s workspace and add their contact details.
View in Calendar
From the Last visit or Next visit panel, or from any row of the Appointment History panel, View in Calendar opens the calendar on the appointment’s day and shows the event details. Use it when you need to make a change you can’t make from the panel.
The calendar can take a few seconds to open. While it loads, the panel shows a spinner.
The Expired Tab
Entries move to the Expired tab on their own when they can no longer be booked. There are two reasons:
- The entry’s Until date has passed without a booking.
- The entry’s appointment type no longer exists.
Expired entries don’t appear on any other tab. The three-dot menu works the same as on the other tabs: Mark as Booked, Edit, Cancel Entry and View log. Use Edit to set a later Until date or choose a current appointment type, which brings the entry back to the active tabs. Use Cancel Entry to clear out entries that are no longer needed.