

Notifying a Waitlist Patient
The OutSmart waitlist does not contact patients on its own when a time opens. Your staff decides who to contact, when, and how. The blue Email and SMS buttons on each waitlist entry make that contact quick: the email starts from a saved template with variables, the text message is written for you, and every message is recorded in the entry’s activity log.
Two ways to reach a waitlisted patient
There are two, and they answer different needs.
| What it does | Use it when | |
|---|---|---|
| A general message | Tells the patient something may be available and asks them to get in touch. No specific time is offered. This page covers it. | You want to talk first, you are not committing to a particular time, or you need to ask them something before booking. |
| A booking invitation | Offers one specific appointment time that the patient books themselves from a link. See Sending a Booking Link. | You have a time you are willing to give this patient and you would rather they took it than played phone tag. |
Both are available on every entry. A general message goes out from the blue Email and SMS buttons described below. A booking invitation starts by clicking one of the entry’s available times.
How to Notify a Patient
From the Waitlist Dashboard Card:
- Find the patient’s entry.
- Beside Contact Preference on the entry, click the blue Email button or the blue SMS button.
Each button opens its own panel. Email opens a panel titled Send Email to and the patient’s first name. SMS opens a panel titled Send SMS to and the patient’s first name. To send both, send one, then open the other.
If the patient has no email address on file, the Email button shows a message saying so instead of opening the panel. The SMS button does the same when there is no phone number on file.
Sending an Email
- Click the blue Email button on the entry.
- Check the email address in the Recipient field. You can change it for this message. Check Update patient record if the new address should replace the one on the patient’s record.
- Review or edit the Subject and the Message. Edit any of the wording to suit the situation.
- Click Preview to see the email with every variable replaced by the patient’s real details.
- Click Send Email to send it. To change something first, click Back.
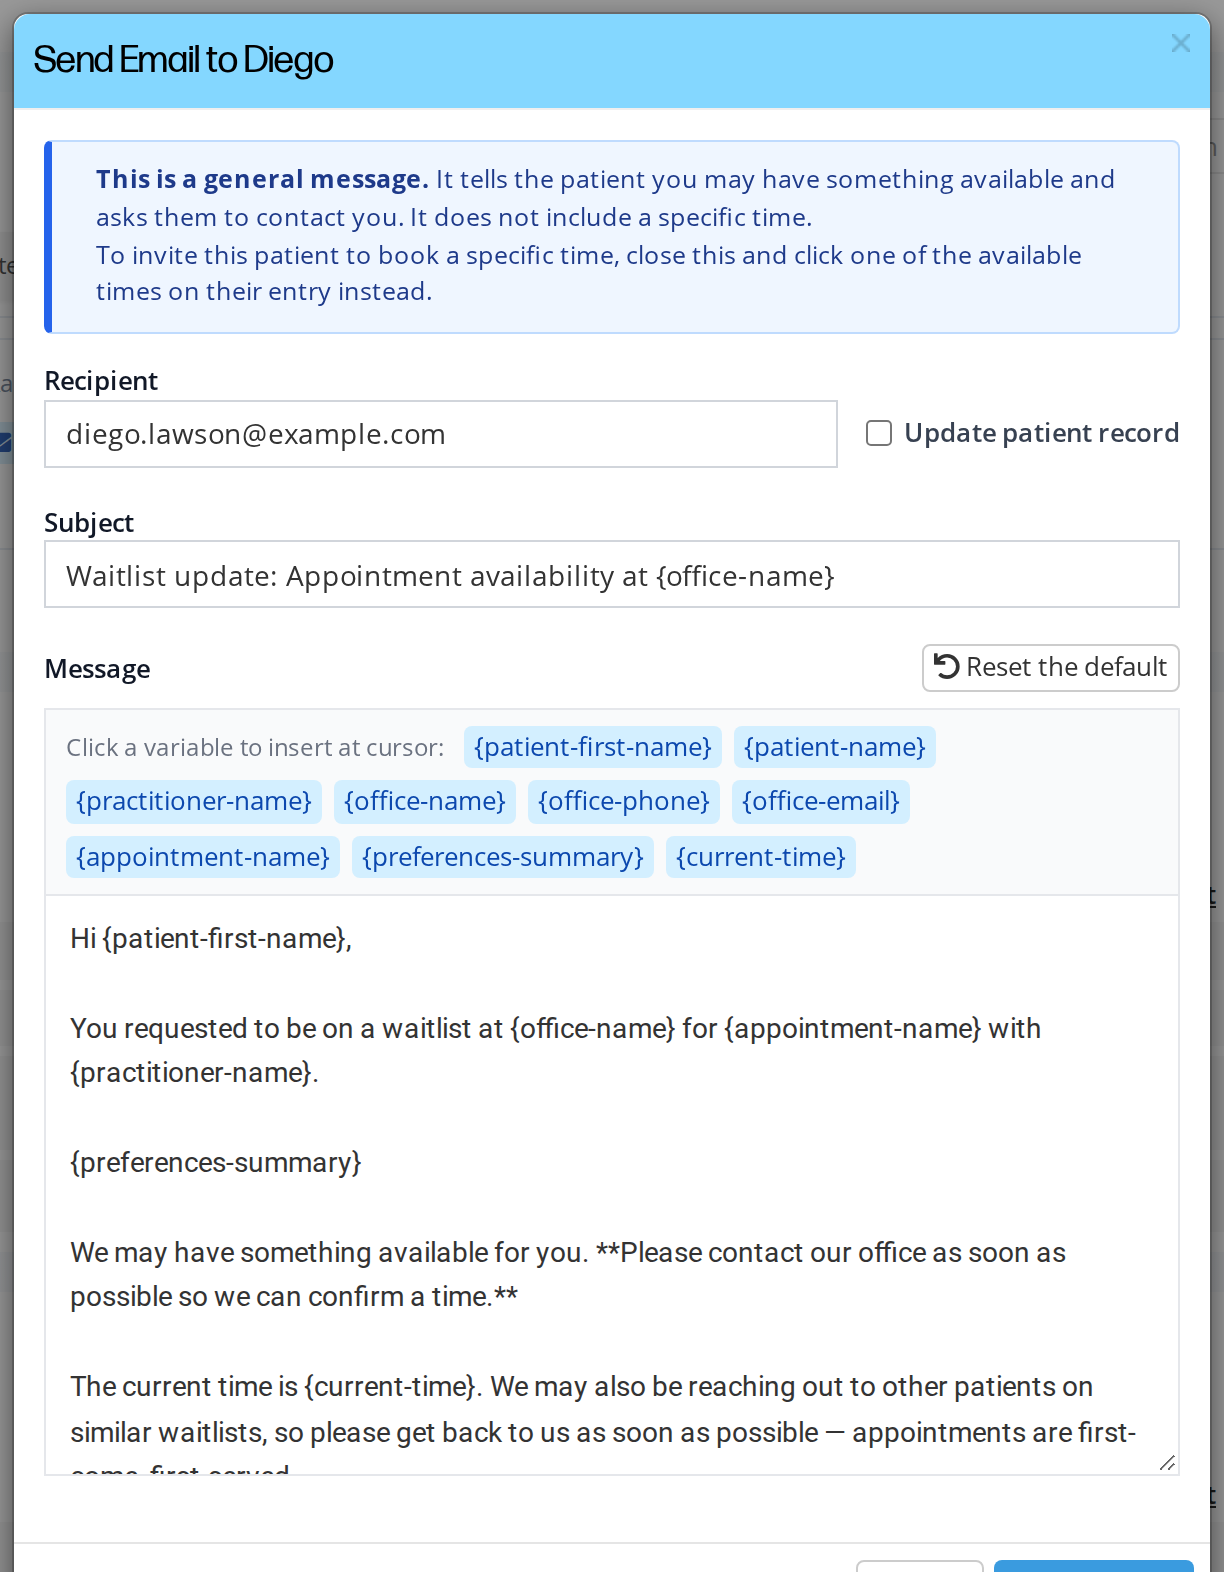
The Send Email window. The message tells the patient that a time may be open and asks them to contact you.
Message Variables
The email subject and message can include variables: placeholders that OutSmart fills in when the email is sent. Above the message box, under Click a variable to insert at cursor:, there is a button for each variable. Click one to add it where your cursor is.
| Variable | Replaced With |
|---|---|
{patient-first-name} | The patient’s first name |
{patient-name} | The patient’s full name |
{practitioner-name} | The practitioner on the entry (or a short list when there are several) |
{office-name} | Your office’s name |
{office-phone} | Your office’s main phone number |
{office-email} | Your office’s email address |
{appointment-name} | The appointment type the patient is waiting for |
{preferences-summary} | A summary of the patient’s preferred days and times |
{current-time} | The date and time the message was sent |
Saving as Default
After you click Preview, a Save as default & Send button appears beside Send Email. It sends the email and saves the current subject and message as the starting point for future waitlist emails. OutSmart first asks Overwrite saved default?. Click Yes, overwrite & send to go ahead.
- When admin staff save a default, it is saved for the whole office, so everyone at the office starts from it.
- When a practitioner saves a default, it is saved for that practitioner only.
Resetting the Default
Click Reset the default, above the message box, to clear the default saved at your level (the office default for admin staff, your own default for a practitioner). The form then shows the next default in line: the office default, or OutSmart’s standard wording if the office has none.
Sending an SMS
- Click the blue SMS button on the entry.
- Check the number under SMS will be sent to. You can change it for this message. Check Save to patient record if the new number should replace the one on the patient’s record.
- Read the text under Message (not editable). The wording of the text message is fixed and can’t be edited. It tells the patient that your office may have an appointment matching their waitlist request and asks them to call you.
- Check the number under Phone number to include in the message. This is the number the patient is asked to call. It starts as the office phone number. To save a different number for future waitlist texts, check Save as office’s waitlist callback default (admin staff) or Save as my waitlist callback default (practitioners).
- Click Send SMS.
Text Messages Depend on the Practitioner’s Plan
Text messages can only be sent when the practitioner on the entry has a subscription plan that includes text messaging. If they don’t, the SMS panel shows only a notice explaining that texts can’t be sent on their behalf, and nothing is sent.
Phone Number Formatting
You can type a phone number in any common format, such as (555) 555-5555, 555-555-5555 or +1 555 555 5555. OutSmart puts it in the right format before sending the text.
Activity Log
Every message, whether it was sent or blocked, is recorded in the entry’s activity log. The log shows:
- Who sent the message
- When it was sent
- Whether it was an email or a text
- The exact message that was sent
- Whether it was sent, failed, or was blocked because of the practitioner’s plan
To see the log for an entry, click the three-dot actions menu on the entry and choose View log. For emails, the log includes a View Email button that opens the email exactly as the patient received it.
See Managing Waitlist Entries for more on the activity log.
Best Practices
- Contact patients whose entries have matching times. Green and orange entries on the dashboard card have matches. Red ones don’t.
- Save a callback number for waitlist texts if patients should call a different line from your main office number, so replies go to the right place.
- Save your own default if you find yourself changing the email wording the same way each time.
- Notify first, then book. Wait for the patient to confirm, then come back and book the time. See Booking a Patient From the Waitlist.
Troubleshooting
The text seems to have been sent but the patient never received it
Open the log with View log. If the status shows “blocked”, the practitioner’s plan doesn’t include text messaging. If it shows “sent” but the patient says they never received it, check the phone number, which may need updating on the patient’s record.
The email shows {patient-first-name} instead of the patient’s name
You’re looking at the editor, not the preview. Click Preview to see the email with the real details filled in.
”Couldn’t notify” message after cancelling an appointment
If you used Cancel and Notify Patient on an appointment but the patient has no email or phone on file, the appointment is still cancelled but no message can be sent. OutSmart gives you a link to open the patient’s workspace so you can update their contact details and reach out yourself.