

Adding a Patient to the Waitlist
When a patient calls or visits the clinic and wants an appointment that you can’t schedule right away, you can add them to the waitlist. The system then checks the calendar for matching openings and shows them on the Waitlist Dashboard Card so your team can act on them.
Where to Add a Patient
There are two places staff can add a patient to the waitlist:
| Entry Point | Best For |
|---|---|
| + button on the Waitlist Dashboard Card | Most common: you’re already looking at the waitlist, or you just need to add someone |
| Find Availability in the calendar | You’ve just searched for a time and nothing fits, so you add the patient from the same window |
The + button opens the Add to Waitlist panel described in this article. Find Availability uses its own form inside the Find Availability window: after a search, click None of these work — Add to Waitlist, fill in the waitlist details, then click Confirm — Add to Waitlist. Both create the same kind of entry. See Find Availability Tool for the calendar-side steps.
Opening the Add Panel
- Open the Dashboard and find the Waitlist Dashboard Card.
- Click the round blue + button beside the card’s Waitlist title.
- The Add to Waitlist panel opens.
Walking Through the Form
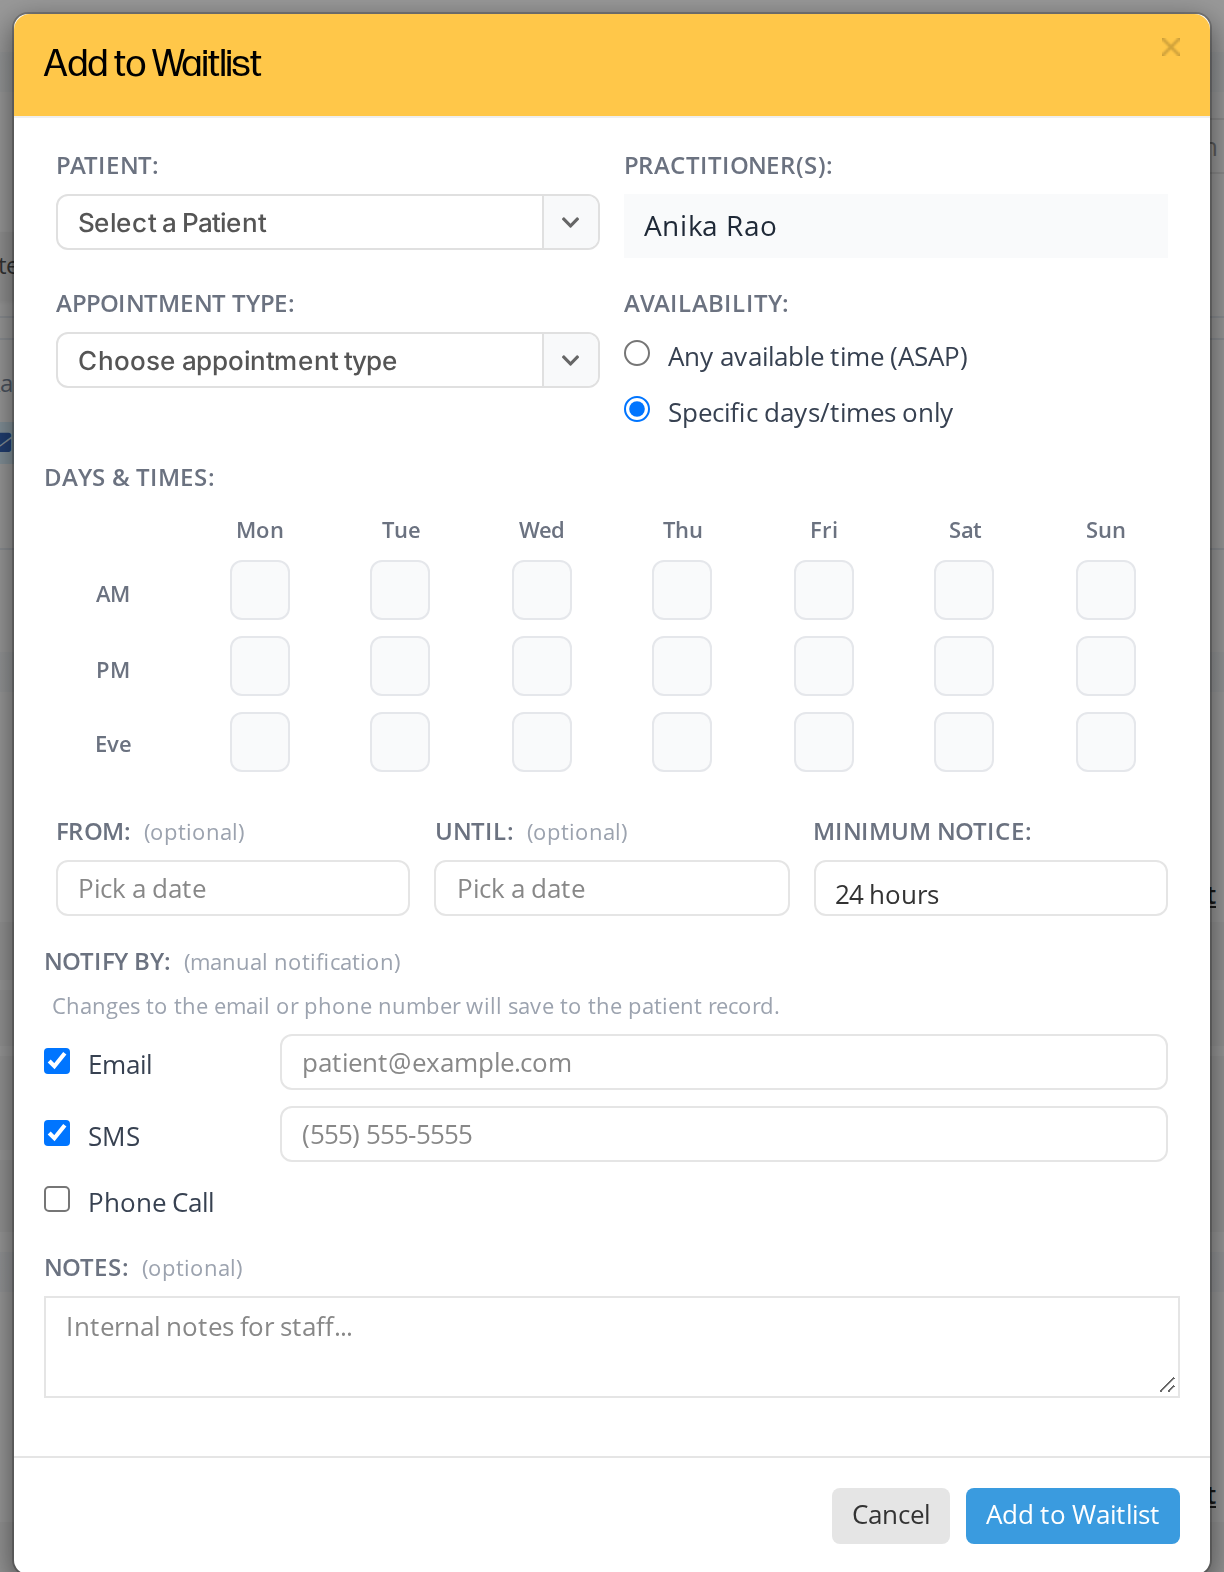
The Add to Waitlist window. Each field is explained below.
Patient
Click the Patient dropdown and start typing the patient’s name. The list searches the patients connected to your office.
Practitioner(s)
- If you’re logged in as a practitioner, this field is set to you and can’t be changed. You can only add patients to your own waitlist.
- If you’re logged in as admin staff, you can pick one or more practitioners from the dropdown.
When you select more than one practitioner, a matching time on any of the selected practitioners’ calendars appears on the dashboard, labelled with that practitioner’s name.
Appointment Type
Pick the type of appointment the patient is waiting for. The dropdown lists the appointment types offered by any of the practitioners you selected.
Availability
Choose one of two options:
| Option | What It Does |
|---|---|
| Any available time (ASAP) | Matches any opening regardless of day or period |
| Specific days/times only | Shows the Days & Times grid below so you can record when the patient is available |
Days & Times Grid
If you chose Specific days/times only, fill in the grid. Each box stands for one day of the week (Mon to Sun) and one period of the day (AM, PM or Eve).
| Period | Time Range |
|---|---|
| AM | 6 am to 12 pm |
| PM | 12 pm to 5 pm |
| Eve | 5 pm to 9 pm |
Check every box when the patient is available. OutSmart only shows times that fall inside a checked box. You must check at least one box, or choose Any available time (ASAP) instead.
From / Until
These optional dates limit the search. Leave both empty to keep the entry open-ended.
- From: the earliest date the patient is available.
- Until: the latest date the patient wants to be considered.
OutSmart only shows times that start inside this range. The From date must be on or before the Until date, or the entry won’t save. If you set Until and that date passes without a booking, the entry moves to the Expired tab on its own.
Minimum notice
How much advance warning the patient needs before an appointment. Choose Same day, 1 hour, 2 hours, 24 hours, 48 hours or 1 week. Times that are sooner than this aren’t shown for this entry.
Notify by
Check the ways the patient is happy to be contacted. Checking a box shows a field for that contact detail:
- Email: shows the patient’s email address.
- SMS: shows the patient’s mobile number.
- Phone Call: shows the same phone number as SMS, for staff to call the patient.
You can edit the email address and the phone number. Changes to the email or phone number are saved to the patient’s record.
Notes (optional)
Notes for your staff. Anyone who can see the entry can read them. The patient can’t see them.
Saving the Entry
Click Add to Waitlist to save. The panel closes, the entry is created, and the dashboard card refreshes to show it.
A patient can have only one active entry for each appointment type. If the patient already has an active entry for the type you picked, OutSmart doesn’t save the new one and tells you that an entry already exists. To change the patient’s preferences, edit the existing entry instead.
What Happens After You Save
- The entry appears on the Waitlist Dashboard Card, under the Available tab if matching times exist, or under No Availability if not.
- The system checks the next 6 months of the practitioner’s calendar for matching times.
- The colour on the entry shows its bookability (green, orange or red) based on what was found.
- No email or text is sent to the patient automatically. Your staff decides when to contact them. See Notifying a Waitlist Patient.
Editing an Existing Entry
To change the practitioner, appointment type, or preferences on an existing entry, click the actions menu (the three-dot button) on the entry and choose Edit. The same form opens with the existing details filled in. See Managing Waitlist Entries.
Troubleshooting
”This practitioner does not offer X” message on save
One of the practitioners you selected doesn’t offer the chosen appointment type. Remove that practitioner, or pick a different appointment type. An appointment type that belongs to one practitioner can only be used with that practitioner. Admin staff can’t assign it to anyone else.
Patient is already on the waitlist for this appointment type
A patient can have only one active entry per appointment type, so OutSmart won’t save a second one. Find the existing entry on the dashboard card and click Edit to change it, or cancel it first and then add the new one.
The patient isn’t in the dropdown
- Check the spelling, or try searching by last name only.
- Confirm the patient is linked to this office. They may exist in OutSmart but be connected to a different office.
- If they’re a new patient, create them in OutSmart first, then come back to the waitlist.
Related Pages
- The Waitlist Dashboard Card: where the entry appears once saved
- Notifying a Waitlist Patient: contact the patient when a time opens
- Booking a Patient From the Waitlist: turn a matching time into a real appointment
- Managing Waitlist Entries: edit, cancel, or mark booked
- Find Availability Tool: search for a matching time, then add the patient to the waitlist if nothing fits