

Booking a Patient From the Waitlist
Once a waitlisted patient has confirmed they want a particular opening, you can book the appointment directly from the Waitlist Dashboard Card without switching to the calendar. The card creates the appointment, marks the waitlist entry as booked, and, if you choose, sends the patient the same confirmation email they’d receive from online booking.
Finding the Slot
On the Waitlist Dashboard Card, click the green slot count on the entry (for example, 12 slots). A list of matching times appears, grouped by date.
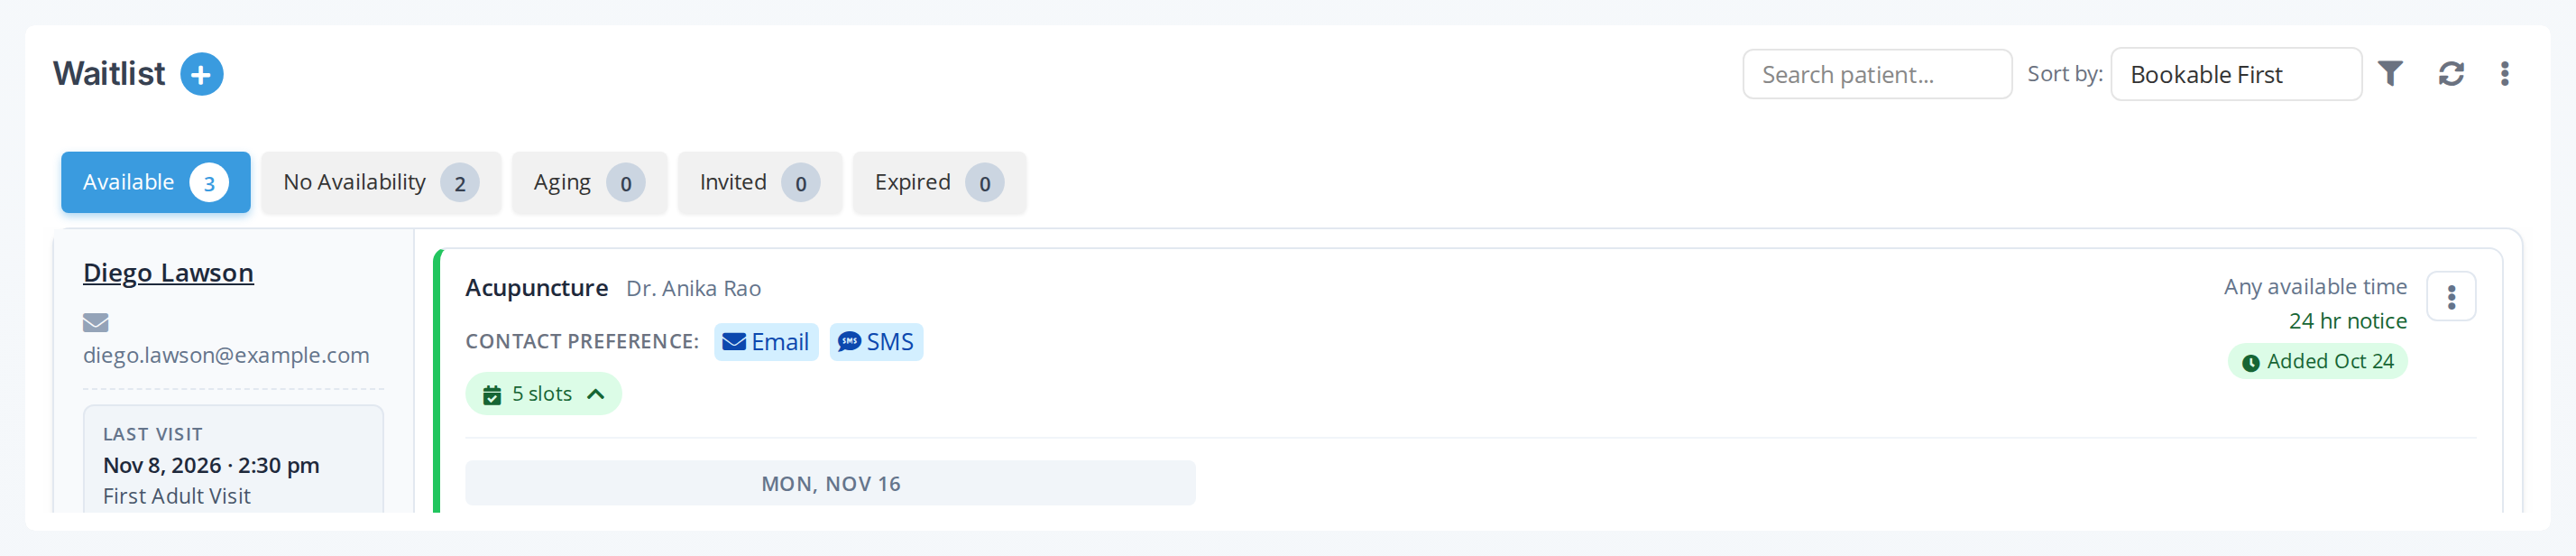
Click the green slot count to show the matching times, grouped by date.
For multi-practitioner entries, each time button also shows the name of the practitioner that time belongs to. The time you pick decides which practitioner the appointment is booked with.
Booking the Slot
Click any time button. A panel titled Book this appointment? opens. It names the time, the practitioner and the patient, and gives you four choices:
| Button | What It Does |
|---|---|
| Book | Creates the appointment. No email or text is sent. Use it when you’ve already confirmed the time with the patient over the phone. |
| Book and Send Confirmation | Creates the appointment and sends the patient the standard confirmation email (intake forms, attachments and custom message, whatever is set up for that event type). |
| Send Booking Link | Sends the patient a link to book this exact time themselves. Nothing is booked and the time is not held. See Sending a Booking Link. |
| Cancel | Closes the panel without booking. |
The appointment is created with the status Pending and the description “Booked from waitlist”, so anyone looking at it in the calendar can see where it came from.
When the appointment type has been deleted
- If someone deleted the entry’s appointment type, the entry shows a Deleted type warning. You can still book it. The panel opens with the title This appointment type has been deleted and a reminder to make sure that’s what you intend.
- If the appointment type no longer exists at all, the entry moves to the Expired tab, shows Type deleted — not bookable, and can’t be booked. Edit the entry and choose a current appointment type, or cancel the entry. See Managing Waitlist Entries.
What “Book and Send Confirmation” Includes
If the event type has a confirmation package set up (intake forms, document attachments, custom message), the patient receives all of it in the confirmation email. This is the same as clicking Save & Send when you book from the calendar.
See Appointment Confirmations for what goes into the confirmation package.
After Booking
Once the booking succeeds:
- The appointment appears in the calendar at the chosen time.
- The waitlist entry is marked as booked and leaves the active list.
- The booked time is removed from any other waitlist entries that were showing it, so two patients can’t both be offered the same time.
- If you chose Book and Send Confirmation, the email is sent.
When the Slot Has Already Been Taken
The card checks availability when it loads, but a time can be booked through the calendar, online booking or by another staff member between the moment you opened the card and the moment you clicked the time. The system checks again before booking.
If the time has been taken, you’ll see a Slot No Longer Available message. The card refreshes the entry’s available times, and you can pick a different one.
Failed Bookings
If the booking fails for any other reason, such as a calendar conflict or an unavailable room, a Booking Failed message explains why. The waitlist entry stays unchanged so you can try again.
If the appointment is booked but the confirmation email can’t be sent, a notification in the corner of the screen tells you so. The appointment is still booked. You can send the confirmation later from the calendar.
Marking an Entry as Booked Without Creating an Appointment
If the patient was booked some other way (for example, another staff member booked them directly in the calendar, or you already created the appointment yourself), you can mark the waitlist entry as booked without creating a new appointment.
Use Mark as Booked from the entry’s three-dot menu. See Managing Waitlist Entries.
Best Practices
- Confirm with the patient before you click Book. The booking happens right away. To undo it, you have to cancel the appointment in the calendar.
- Use Book and Send Confirmation for new patients and for any appointment with intake forms, so the patient gets the same package they would have received through online booking.
- Use Book when you’ve just had the patient on the phone and they don’t need a follow-up email.
- For multi-practitioner entries, check the practitioner name on the time button before clicking. The patient is booked with whichever practitioner that time belongs to.
Troubleshooting
The patient confirmed by email but I clicked the wrong slot
The booking is now a regular calendar appointment. Open it in the calendar and either reschedule or cancel it. See Editing Events and Deleting & Recovering Events.
I clicked Book but nothing happened
Look at the entry again after a couple of seconds. If the entry has gone, the booking succeeded. If an error message appeared, it names the problem. If neither happened, refresh the dashboard.
The confirmation didn’t go out
Check whether the event type has a custom confirmation message. Without one, the confirmation package (intake forms, attachments) isn’t sent. See Appointment Confirmations.
Related Pages
- The Waitlist Dashboard Card
- Notifying a Waitlist Patient: usually the step before this one
- Sending a Booking Link: let the patient book the time themselves
- Managing Waitlist Entries: mark booked, cancel, edit
- Appointment Confirmations: what gets sent with Book and Send Confirmation
- Booking Events: the equivalent flow from the calendar