

Editing Events
Common Event Edits
You can edit many aspects of an event depending on your needs:
- Status changes: mark appointments as cancelled, no show, confirmed, and so on.
- Time changes: move appointments to different dates or times.
- Practitioner changes: reassign appointments to different practitioners.
- Location changes: update office or room assignments.
- Patient details: update the patient’s mobile number and text message preference.
- Event descriptions: add internal notes about the appointment.
Opening the Calendar
To edit any event, start by accessing your calendar:
- Click the calendar icon at the top right of the screen
- Browse the calendar to find the event you want to edit
- Click on the event once to open the event card
The Event Card
When you click on an event once, an event card appears, hovering above the event in the calendar. This card displays quick information and provides fast-access editing tools.
What You See on the Event Card
The event card shows:
- Event type, duration, date and time, in the coloured header
- Current status, in the header, for patient appointments
- Patient name, age, email address and phone number
- Practitioner, office and room assigned to the appointment
- The description, if there is one
- Send Reminder and Send Confirmation links, for patient appointments
- A More Details link at the bottom right
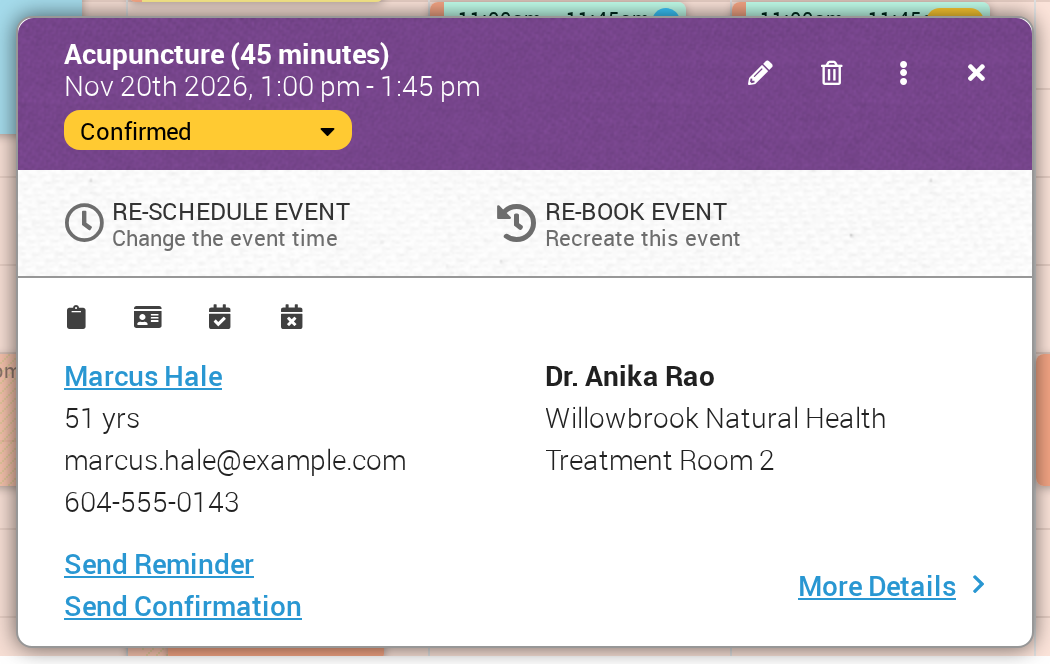
Click an event once to open its event card. The pencil, bin, three dots and X icons sit at the top right of the card.
Quick Actions Available
The event card provides several quick editing options without opening the full editor:
| Action | What It Does |
|---|---|
| Status Dropdown | Change appointment status (pending, confirmed, cancelled, no show, etc.) |
| re-schedule event | Move the appointment to a new time and mark the original as rescheduled |
| re-book event | Create a copy of the appointment at a new time |
| Edit Icon (Pencil) | Open the full event editor panel |
| Delete Icon (Trash) | Delete the appointment from the calendar |
| Options (three dots) | Open a menu of more actions, such as Check In and Send Confirmation |
| Close (X) | Close the event card |
| Send Reminder | Send the patient a reminder now |
| Send Confirmation | Send the patient a confirmation now |
| More Details | Open the event’s full details, including its logs |
Icon Buttons on the Event Card
For a patient appointment, a row of small icon buttons sits just above the patient’s name. Hover over a button to see its name.
- Create Smart Chart (clipboard icon) starts a new SOAP chart for this appointment. Only practitioners see this button.
- Go To Patient Workspace (ID card icon) opens the patient’s workspace in a new tab.
- Check In (calendar with a check mark) sets the appointment status to Attended.
- Cancel Appointment (calendar with an x) sets the appointment status to Cancelled.
Send Reminder and Send Confirmation
Below the details of a patient appointment are two links, Send Reminder and Send Confirmation. Click one to send that message to the patient straight away. After a message has been sent, the card says Reminder Sent or Confirmation Sent, with a (Send Again) link beside it.
Quick Status Changes
To quickly change an event’s status:
- Click on the event once to open the event card
- Click the status dropdown in the coloured header of the card
- Select the new status (Cancelled, No Show, Confirmed, etc.)
- The status updates immediately and an Event Updated message appears
The status dropdown appears on the event card for patient appointments only. To change the status of a non-patient event, click the pencil icon and change the Status field in the event editor panel.
Common Status Changes
| Status | When to Use |
|---|---|
| Cancelled | Patient cancelled the appointment |
| No Show | Patient didn’t attend |
| Confirmed | Patient confirmed they will attend |
| Attended | Patient came to the appointment |
| Completed | Appointment finished successfully |
| Rescheduled | Automatically set when using re-schedule event |
Reschedule Event
Use re-schedule event when a patient cannot attend and needs to move their appointment to a different time.
How Rescheduling Works
- Click on the event once to open the event card
- Click “re-schedule event” (the clock icon, labelled “Change the event time”) below the card’s header
- The event editor panel opens on the right side with a copy of the appointment
- Navigate the calendar to find the new date/time
- Click where you want the new event to appear. The copy moves to that time.
- Click Save or Save & Send. The system saves the copy at the new time and marks the original as “Rescheduled”
Navigating to Different Weeks
If you need to reschedule to a different week or month:
- Use the arrow buttons at the top of the calendar
- Navigate forward or backward between weeks or days
- Click on the new time slot when you find it
- The appointment will be copied to that location
Sending Confirmation After Rescheduling
After rescheduling, the event editor panel appears with the new appointment details:
- At the bottom, you’ll see Save and Save & Send buttons
- Click “Save & Send” to notify the patient of the new appointment time
- The patient will receive a confirmation with the updated date and time
Rebook Event
Use re-book event when the patient attended (or will attend) their appointment and you want to book another similar appointment in the future.
How Rebooking Works
- Click on the event once to open the event card
- Click “re-book event” (labelled “Recreate this event”) below the card’s header
- The event editor panel opens with a copy of the appointment, set to Pending
- Click the new date/time in the calendar. The copy moves to that time.
- Click Save or Save & Send to book the copy
- The original appointment remains unchanged
Reschedule vs. Rebook
| Feature | Reschedule | Rebook |
|---|---|---|
| Creates copy | ✓ Yes | ✓ Yes |
| Marks original as “Rescheduled” | ✓ Yes, when you save | ✗ No |
| Keeps original appointment | ✓ Yes, marked Rescheduled | ✓ Yes (unchanged) |
| Use case | Patient can’t attend, moving appointment | Patient needs follow-up appointment |
Event Card Icons
At the top right of the event card, you’ll see four icons: a pencil, a trash can, three dots and an X. The X closes the card.
Edit Icon (Pencil)
Click the pencil icon to open the full event editor panel with advanced editing options.
Delete Icon (Trash Can)
Click the trash icon to delete the appointment from the calendar. The event is deleted straight away, without a question first, and an Event Deleted message appears. A deleted event can be brought back: see Deleting & Recovering Events.
More Options (Three Dots)
Click the three dots to access additional actions:
- Check In: sets the appointment status to Attended.
- Cancel Appointment: sets the appointment status to Cancelled.
- Send Confirmation: sends the patient a confirmation.
- Send Reminder: sends the patient a reminder.
- Open Patient Workspace: opens the patient’s workspace.
- Open New Smart Chart: starts a new SOAP chart for the patient. Only practitioners see this choice.
The bottom of the menu shows the event’s ID number, which is useful if you contact Ask OutSmart about this event.
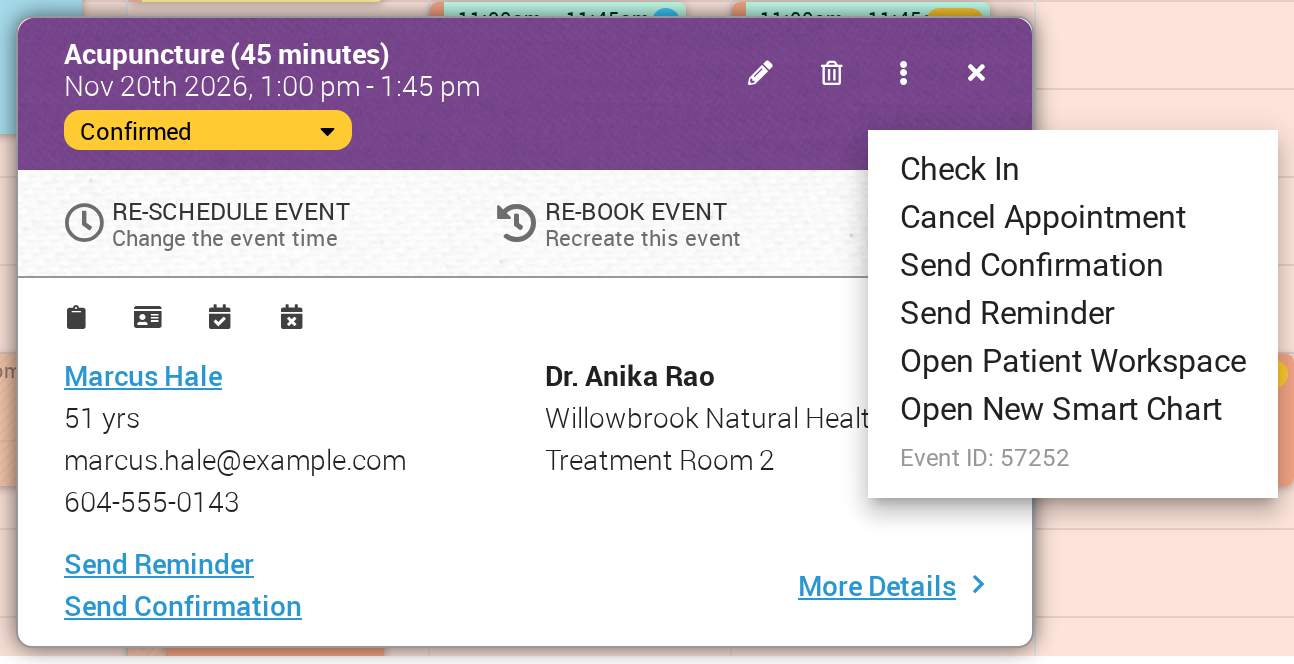
The three dots menu on the event card. The Event ID at the bottom helps when you ask OutSmart about an event.
Delete vs. Cancel
Understanding the difference is critical:
Delete (Trash Icon)
- Removes the appointment from the calendar view
- Use when: The appointment was created by mistake
- Use when: The event should never have been booked
- The deleted event is not counted as a cancellation, but OutSmart keeps it so it can be recovered through Calendar Search
Cancel (Three Dots Menu or Cancel Appointment Icon)
- Keeps the appointment in the calendar
- Marks status as “Cancelled”
- Use when: Patient cancelled their appointment
- Use when: You want to track cancellations
- Maintains a record for reporting and analytics
Full Event Editor Panel
To access all editing options, click the pencil icon (edit) on the event card. This opens the event editor panel on the right side of the screen.
What You Can Edit
The event editor panel allows you to change:
| Field | What You Can Change |
|---|---|
| Practitioner | Assign the appointment to a different practitioner |
| Patient | Change which patient the appointment is for |
| Mobile Phone Number | Update the patient’s mobile number |
| Text message checkbox | Turn text message notices on or off for that number |
| Type of Event | Change the type of appointment |
| Office / Rooms | Move the appointment to a different office or room |
| Date and Time | Manually adjust when the appointment occurs |
| Status | Change appointment status |
| Description | Add internal notes (not visible to patient) |
Changing the Practitioner
If a patient needs to see a different practitioner:
- Click the pencil icon on the event card
- The event editor panel opens
- Click the Practitioner dropdown
- Select the new practitioner
- Click “Save” or “Save & Send” at the bottom
Changing the Patient
If you need to reassign the appointment to a different patient:
- Open the event editor panel (pencil icon)
- Click the Patient dropdown
- Search for the new patient by typing their name
- Select the patient from the results
- Click Save
Updating Contact Information
You can update patient contact preferences directly from the event editor. These fields appear below the Patient field once a patient is chosen:
- Mobile Phone Number: change the patient’s mobile number.
- Text message checkbox: the checkbox below the number asks whether the patient wants to receive notices at this number. Check it to send notices by text message, or uncheck it to stop them.
Changing Event Type
To change what type of appointment this is:
- Open the event editor panel
- Click the “Type of Event” dropdown
- Select the new event type
- Click Save
Changing Office or Room
To update where the appointment takes place:
The Office / Rooms fields sit below Type of Event in the event editor panel.
Change Office
- Open the event editor panel
- Click the office field
- Select the new office location
- Click Save
Change Room
- Open the event editor panel
- Click the room field below the office
- Select the specific room. You can choose more than one room.
- Click Save
Manually Changing Date and Time
You can adjust the appointment time manually from the event editor:
- Open the event editor panel
- Edit the start date to change the appointment date
- Edit the start time and end time to change when the appointment begins and ends
- Click Save or Save & Send
Adding or Editing Description
The description field allows you to add internal notes:
- Open the event editor panel
- Scroll to the Description field
- Type your notes or edit existing text
- Click Save
What to Include in Descriptions
Common uses for the description field:
- Special patient requests
- Specific concerns to address
- Equipment or materials needed
- Notes from phone calls
- Internal reminders
Save vs. Save & Send
After making edits, you have two options at the bottom of the event editor:
Save
Click “Save” when:
- Making minor changes (description, room, etc.)
- You don’t want to send the patient another notification
- Changes don’t affect the appointment details the patient needs to know
The appointment is updated but no emails or texts are sent.
Save & Send
The Save & Send button appears only for events with a patient.
Click “Save & Send” when:
- Changing the appointment time
- Changing the practitioner
- Changing the office location
- Making any change the patient should be notified about
The appointment is updated AND the patient receives:
- Confirmation email with new details
- Any custom email templates configured for this event type
- Links to intake forms (if applicable)
Common Editing Scenarios
Patient Calls to Reschedule
- Click on the appointment
- Click re-schedule event
- Navigate to the new date/time
- Click on the new time slot
- Click Save & Send to notify the patient
Patient Calls to Cancel
- Click on the appointment
- Click the three dots icon, or the Cancel Appointment icon above the patient’s name
- Click Cancel Appointment
- The appointment is marked as cancelled
Patient Didn’t Show Up
- Click on the appointment
- Use the status dropdown on the event card
- Select No Show
Need to Change Practitioner
- Click on the appointment
- Click the pencil icon (edit)
- Change the Practitioner dropdown
- Click Save & Send
Adding Internal Notes
- Click on the appointment
- Click the pencil icon (edit)
- Scroll to Description field
- Add your notes
- Click Save
Patient Needs Follow-Up Appointment
- Click on the current appointment
- Click re-book event
- Click the new date/time for the follow-up
- Click Save & Send
Troubleshooting
Can’t Find the Event to Edit
- Use the calendar navigation arrows to browse different weeks
- Check if you’re viewing the correct practitioner’s calendar
- Verify you’re looking at the correct date
- Try searching for the patient’s name with Search Calendar (click the magnifying glass at the top right of the calendar)
Changes Not Saving
- Ensure you clicked Save or Save & Send
- Check that all required fields are filled
- Verify you have permission to edit this event
- Try refreshing the page and attempting again
Patient Didn’t Receive Notification
- Verify the patient has an email address on file
- Check if you clicked Save & Send (not just Save)
- Look for an Emails stopped line on the event card. It means emails to the patient’s address have been stopped. See When Emails to a Patient Are Stopped
- Verify the event type has email settings configured
- Check the patient’s spam/junk folder
Best Practices
- Always use Cancel (not Delete) for patient cancellations to maintain records
- Use re-schedule event when the patient can’t attend and needs a new time
- Use re-book event when scheduling follow-up appointments
- Click Save & Send only when the patient needs to be notified
- Add descriptions for important patient notes or special requests
- Double-check the new time before clicking Save & Send on rescheduled appointments